
Four steps to create the perfect luxury beach picnic
We all live busy lives so if you are going to get together with your best friends, why not make it night to remember? These four easy steps will help you create a memorable experience for sure!
Step One: Visualize Decide the mood and purpose of the evening. Are you aiming for relaxed conversation, a photo-worthy celebration, or a romantic sunset for two? Choose a color palette and a few focal pieces (blanket or low table, cushions, a light centerpiece) to create a cohesive look without overthinking details. Pick a beach spot with easy parking and a comfortable sunset view, and check tide times and local rules. Consider the timing: arrive 30–45 minutes before sunset to set up and capture golden-hour light.
Step Two: Send invites Keep it simple and clear. Share the who, what, when, where, and any special notes (bring jackets, shoes for walking, or a small blanket). Use a group text, a quick email, or an event on your favorite app—include a map pin and a backup plan in case of bad weather. Ask guests to RSVP so you know numbers for seating and food. If the event has a theme or a color scheme, mention it so guests can coordinate if they want.
Step Three: Order food, consider having it delivered to the beach to save you time. Or if you’re making your own, choose food that travels and can be enjoyed at room temperature. Build a mix of flavors and textures: a main finger-food option (sandwiches, wraps, gourmet flatbreads), a variety of small bites (cheeses, charcuterie, olives, nuts), fresh fruit, and an easy dessert (cookies, brownies, or macarons). Include one or two crowd-pleasing special items—something a bit elevated, like a flavored hummus, marinated olives, or a signature sweet. Pack items in reusable containers or disposable trays for easy serving. Don’t forget beverages (sparkling water, a signature cocktail or mocktail, wine or canned cocktails) and enough ice or coolers to keep things chilled. Order ahead from a local deli, bakery, or catering service if you prefer not to prepare it yourself.
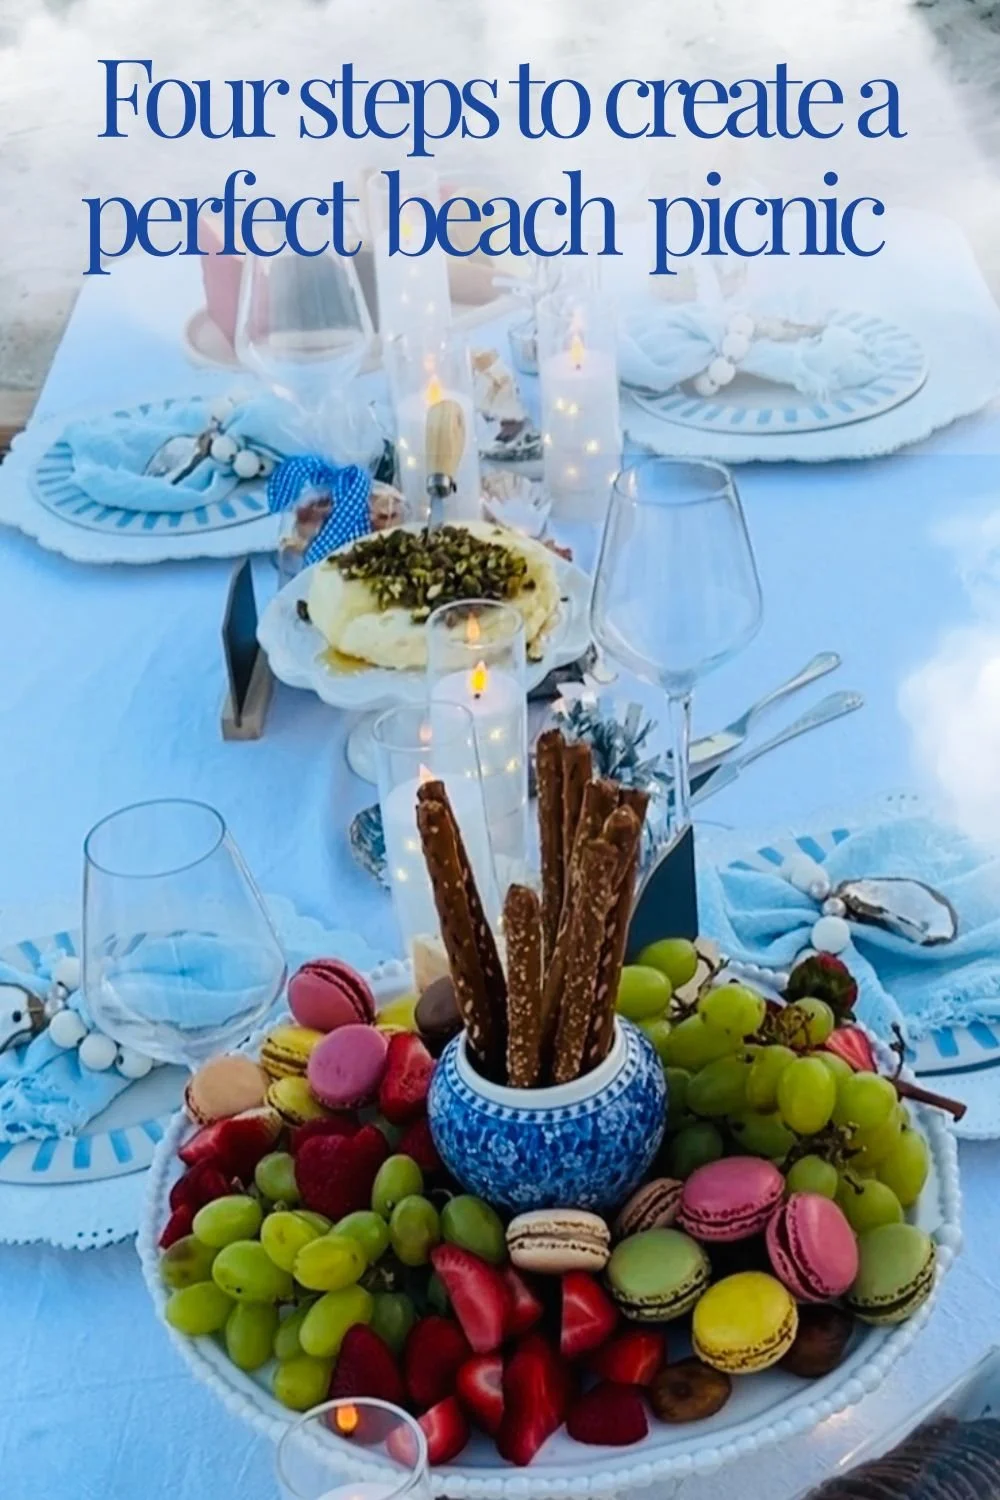
Step Four: Set the table and enjoy Arrive early to lay out your base: a large blanket or rug, cushions or low seating, and any tables or trays. Group food by type for easy grazing and place napkins, plates, utensils, and trash bags within reach. Add ambient touches—battery operated candles and string lights; shells or a small vase with seasonal flowers—to enhance the atmosphere without fuss. Keep music low and portable if desired. Once everything’s set, relax and be present: welcome guests, guide them to the setup, and let the evening flow. Take photos during golden hour, savor the food and conversation, and leave the beach as tidy as you found it.
If you’d like to replicate this picnic I’ve included links. FYI some are affiliate links.
Low Table and Tablecloth
This camping table is easy to carry because the top rolls up and fits in a carrying bag. Fits four nicely. Use a table cloth over it to dress it up if you want.
I like plain white tablecloths. They create a nice base and you can reuse with almost any color theme. This is 2 pack is very affordable.
Plates
If you are only gingerbread to do one picnic and never eat out on your patio then go ahead and get white plastic plates and dispose of them. But if you like to eat outside, consider buying a nice set of melamine plates. They look great and are dishwasher safe and will last you several seasons. I always go with white. They are versatile and will lend themselves to any theme by changing up napkins and flowers. I like these white beaded plates because they are classic.and you can pair any color salad plate to add color. The salad plates pictured are from Belks from last summer. They are on super sale until they are gone. I love all three sets!
But the trend for the wavy border is wonderful and if you are looking for those, try these will look great.
Stemware
Go with Tritan & BPA free (glass is a no noo on the beach). I like the stemware but if you prefer stemless, go with that. I use to buy Pottery Barn’s stemware but have switched over to this Amazon brand and never looked back.
Flatware
Flatware can take your picnic to another level. We use to use silver but now a days so many people don’t like the metal taste. Looking for a great set? This Wallace Hotel Lux is by far my favorite and it lasts!!!
If you prefer not to use flatware, this set is has everything you need to serve your food. It even includes labels for your cheeses!
Table Accessories
I use melamine cake plates, cupcake holders, anything that will add a little dimension to the table. If you are ordering food in containers try using a try level serving plate.
This pedestal stand is my go to.. It’s large enough to stack another one on top. I also use these metal stands to stack other alone. I always have my eyes open at Home Goods. The pretzels are in a little ginger jar vase. I bought a set of four and use them all the time for flowers, food and just a dab of color. They are porcelain but they are solid and don’t break like glassware.
Candles.
I have fallen in love with these candles from Amazon because you can see them in the daylight and they look fabulous after dark. I always used the pillar candles but they only came alive after dark and I always suggest picnics start at the golden hour. This set was a game changer!
Okay, I think that’s it. If you have any questions, feel free to email me and I’ll help you the best I can. Thanks- Nancy