
Are fake flowers tacky?
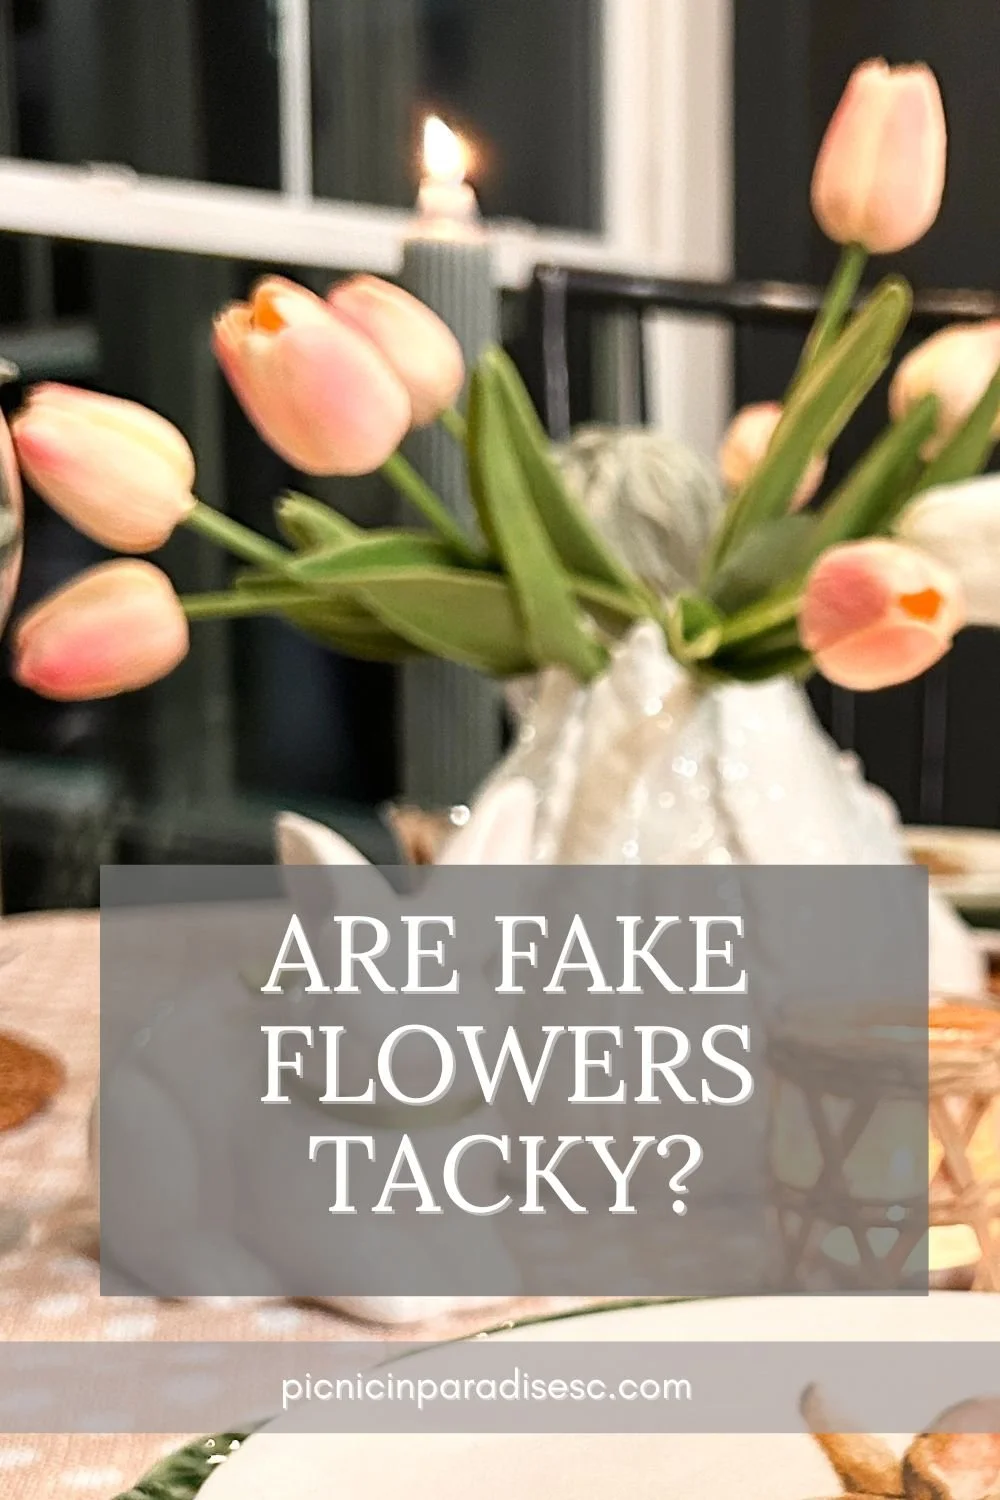
Absolutely not!
We’ve come a long way from plastic flowers that looked like, well plastic flowers. Today’s real touch flowers are often so real looking that even up close, they look real. We use them all the time for our picnics!
One tip is to stay away from the glass vases. I know people are putting water in the vases on Pinterest but if you plan on using them again, I’m not sure how well they’ll hold up. I love the leaf vase in the photo.
My favorites are the real touch tulips for spring. Gather them together and place in vase, easy and amazing! I’ve just bought thI’ve just bought these ese on Amazon and love them (and the price). Home Goods has been offering high end stems and they are good prices.
This post has affiliate links.
Don’t make these outdoor party mistakes
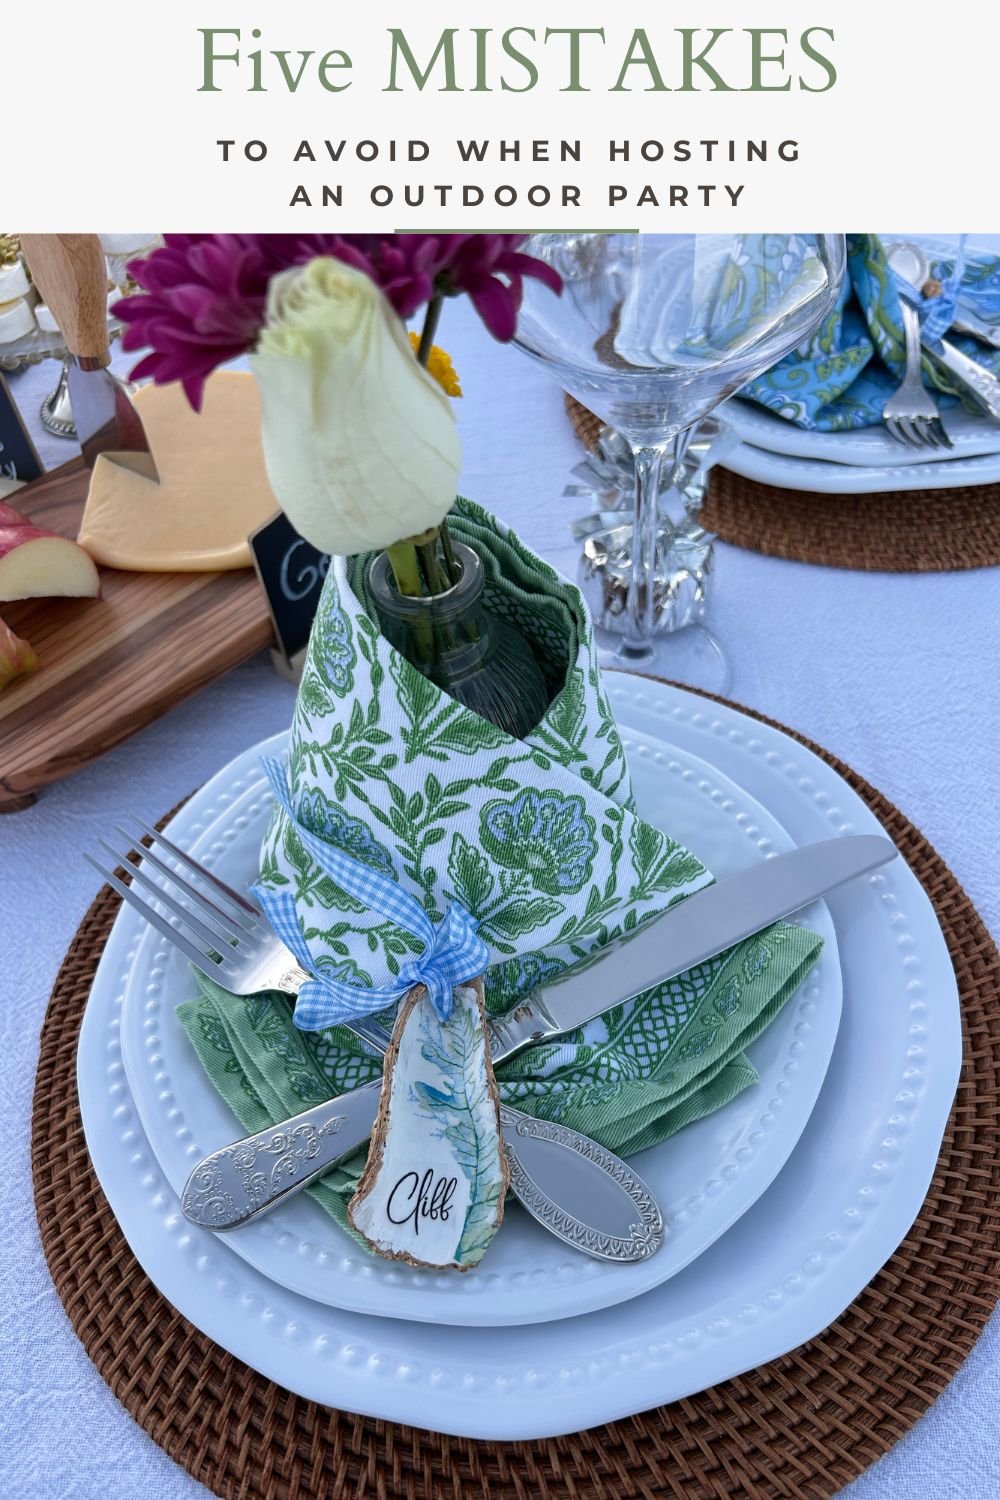
Five Common Outdoor Party Table Setting Mistakes
An outdoor party can be amazing, but it can also spell disaster. Here are some tips on avoiding the common pitfalls when you’re setting your table.
Avoid glass stemware, it breaks and is a bear to clean up from grass and poolside. Try Triton stemware. It’s thicker and feels elegant. I use these all the time.
Keep your centerpieces low. Nothing is worse than trying to have a conversation when your guests can’t see each other through the flowers. Try bud vases with a couple of stems and cluster tbud vaseshem or place on each plate.
Use cloth napkins. I love these from Two’s Company.. They are pricey but Amazon has a wonderful selection of dupes that will do. Try to stay between 20 and 17 inches. Any smaller and they feel too small.
Hang string lights over the table AND use candles. There’s usually not enough light from candles to eat comfortably. If you want real candles make sure they have globes to block the wind. These flickering candles are gorgeous and feel very real.
Prepare your cocktails ahead and limit your appetizers. You don’t want them full before they eat.
This post has affiliate links.
The secret is out!
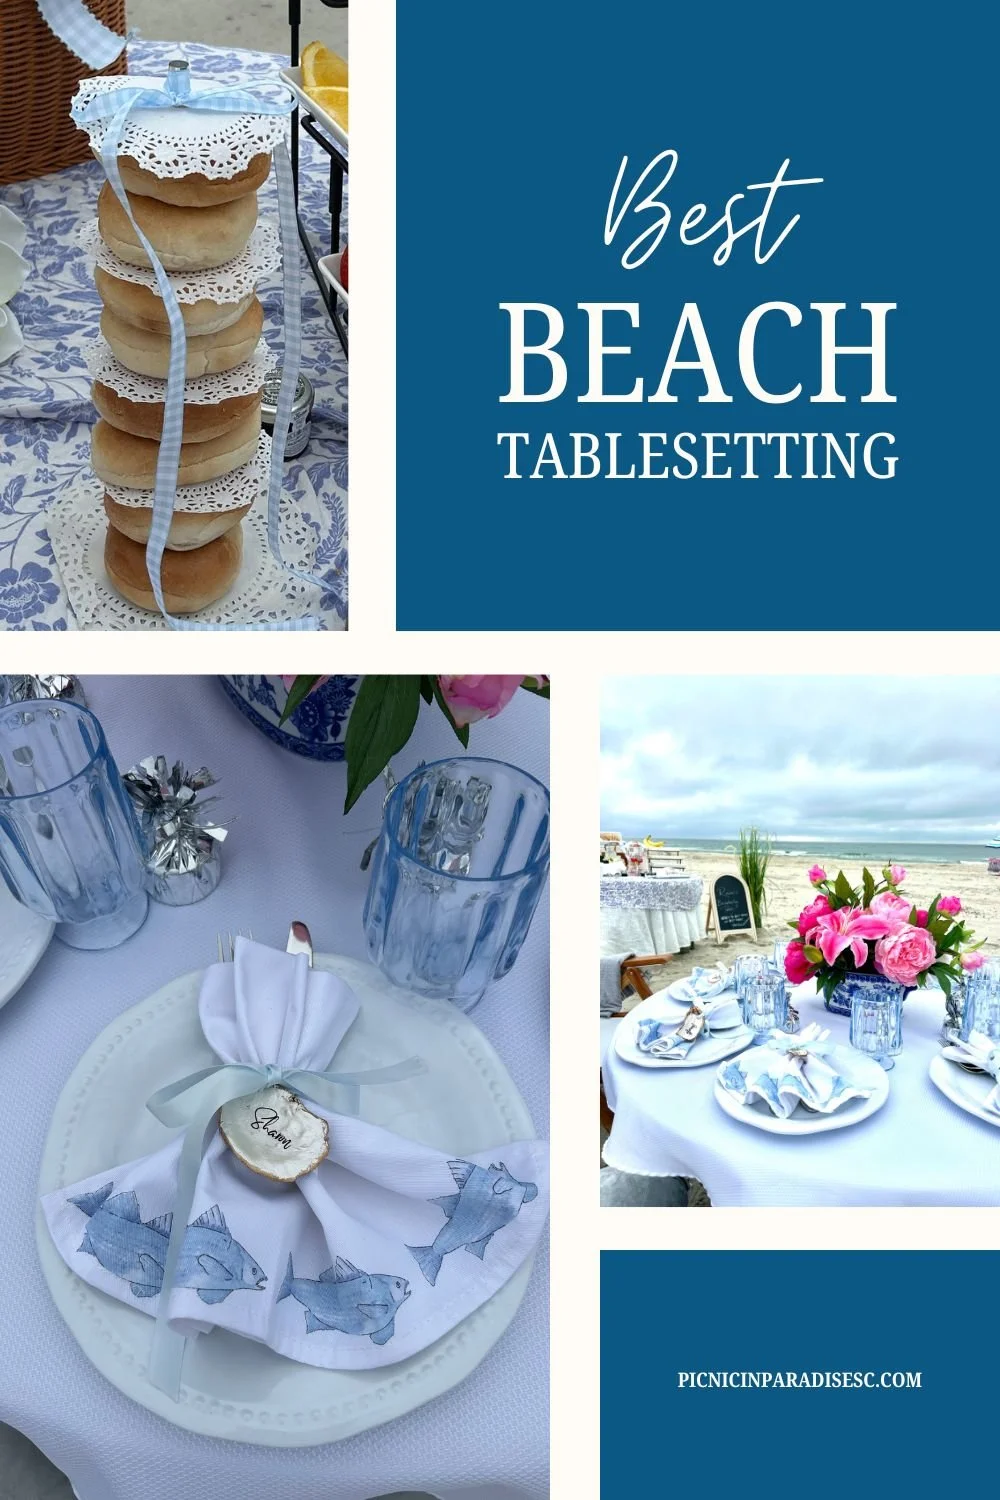
The secret to creating a successful beach table setting
Setting a table on the beach is a balance between form and function. You want it to be beautiful but you also need things not to blow away. Save this for the next time you want to host a beach picnic! My secret is to weight everything. Napkins weighted with napkin rings. Really windy? Add the silverware to the ring. Flowers? Put sand in the vases. Glasses? Weight them down with balloon weights.
How to make the perfect Aperol Spritzer
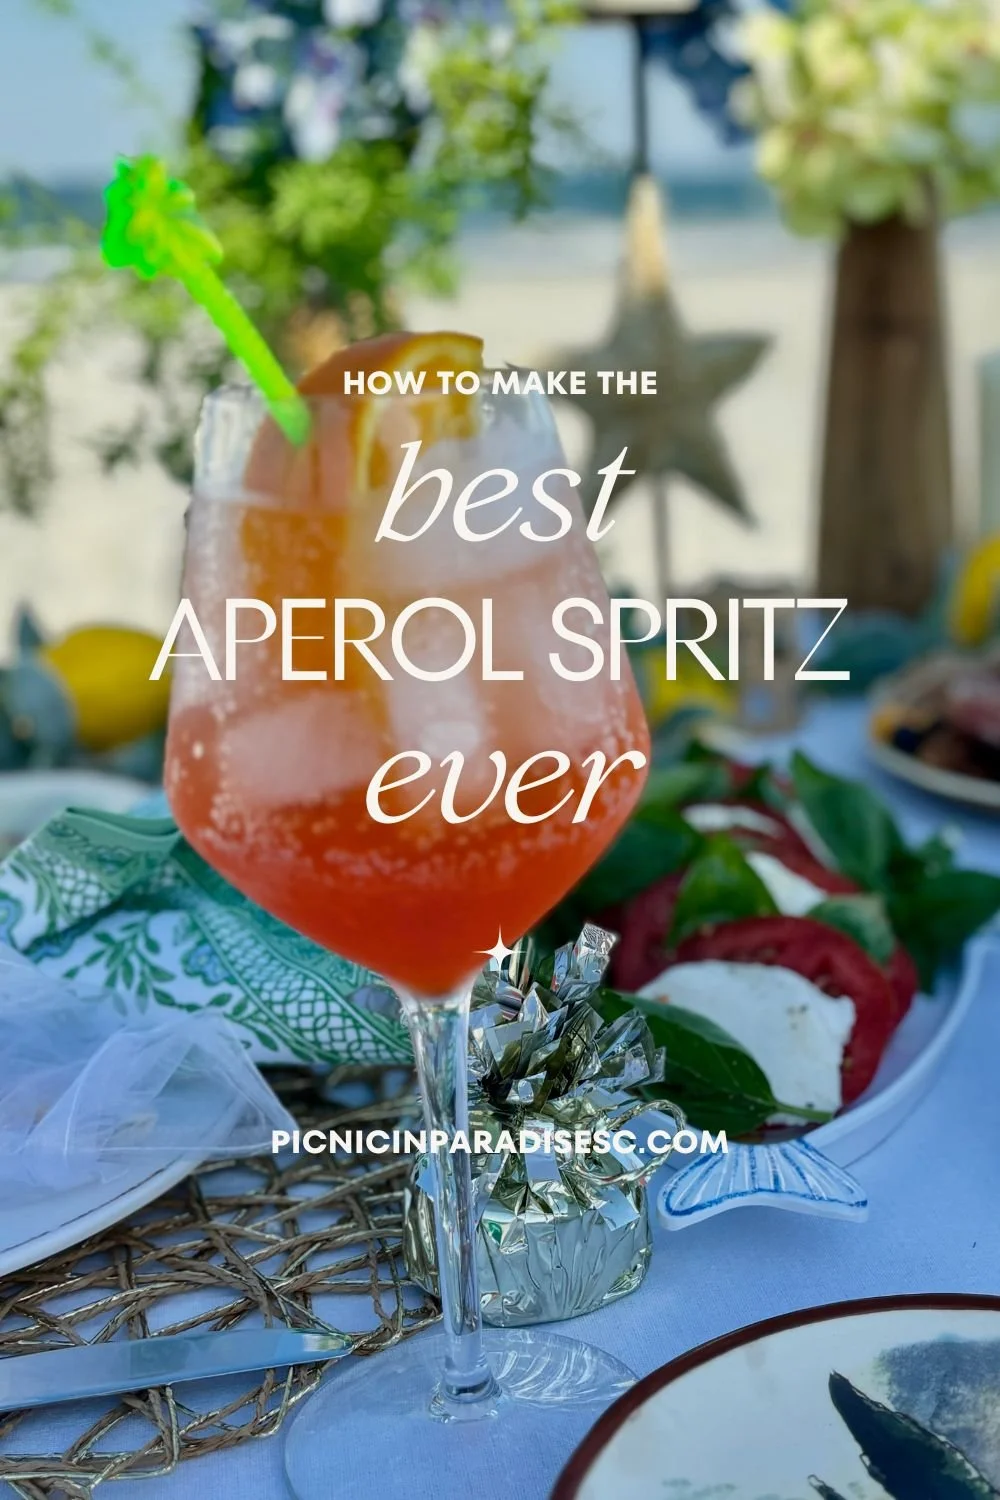
How to make the best Aperol Spritz Ever!
Our local celebrity here in the Low Country is Mandi Casey, author of Mangia Y'All. She told us the secret to her Aperol Spritz is to add a bit of Cointreau with a 3-1-1 mixture. 1 oz Prosecco, 1 oz Cointreau, 1 oz Aperol, a splash of club soda and garnish with an orange slice. It's really yummy!
fill your glass with ice, add ingredients and stir lightly. If you’re taking to the beach, make sure you ditch the glass and bring some triton stemware!
Recreate this Bachelorette Beach Picnic
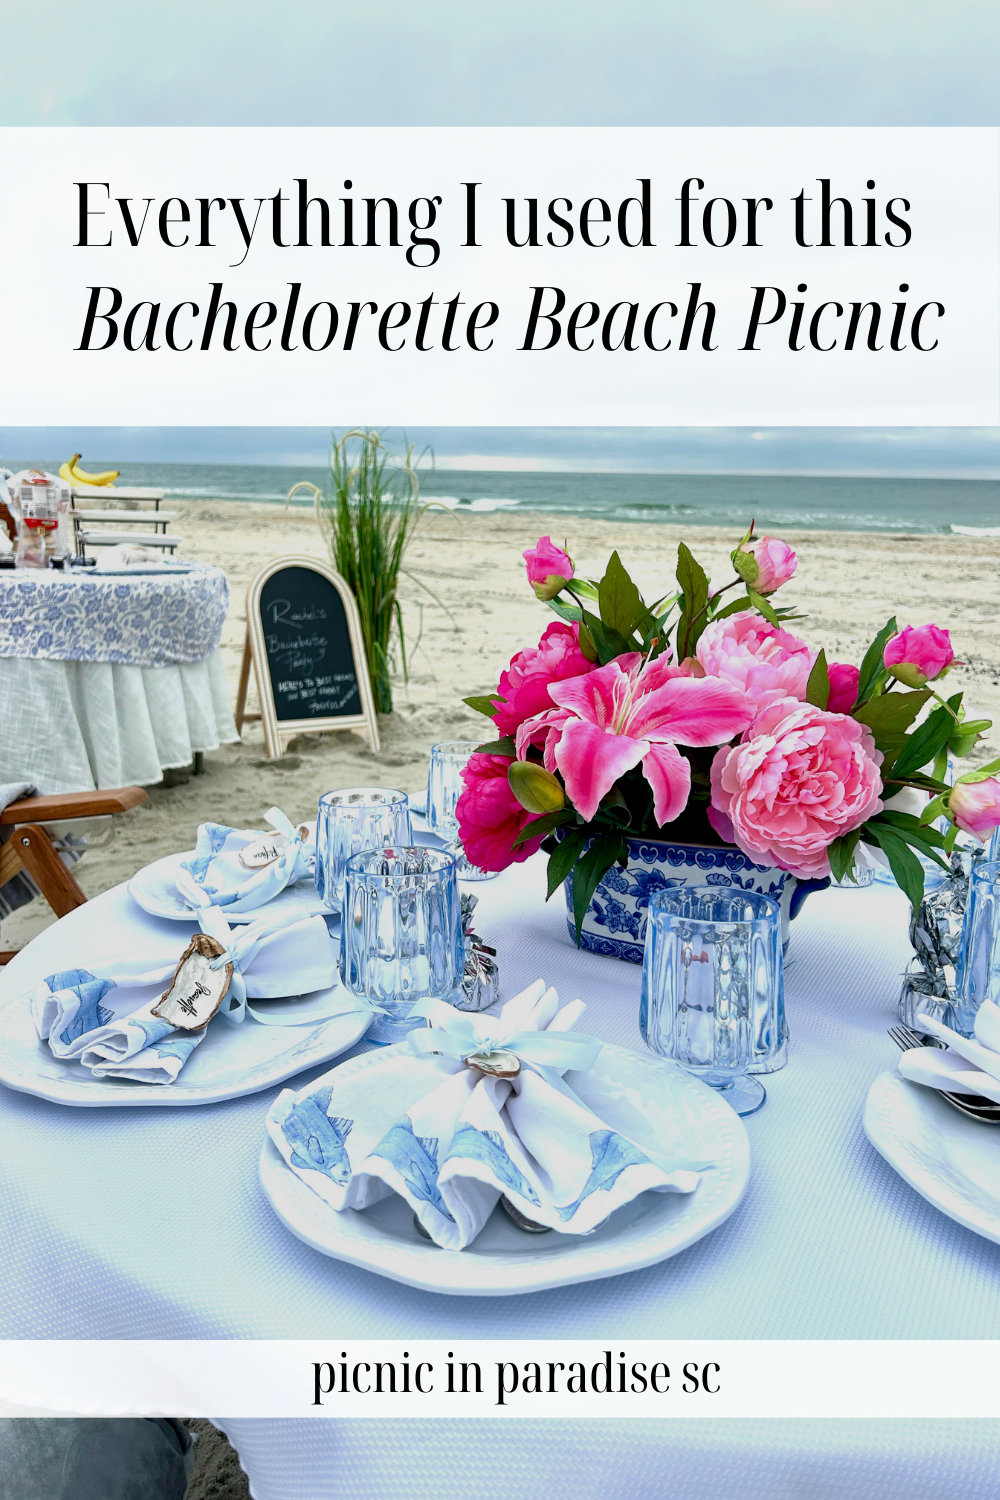
Why not host this Bachelorette Breakfast?
Thinking of hosting a bachelorette weekend at the beach? Don't forget to include an elegant breakfast on the beach! Keep the food simple and the table beautiful.
For the menu consider brie and croissants, minoi bagels and cream cheese, sweet breakfast cakes and fresh fruit such as watermelon, strawberries and bananas. Beaches don't allow glass so make sure your mimosas are served in plastic carafe. Keep the food on a separate table so you don’t feel cluttered.
My secret to any tablesetting is a crisp white tablecloth. Use your flowers to add color. This silk bouquet came from Home Goods. I like to use blues and white for the beach. The glasses were from Home Goods. The white plates can be flat or wavy . Look for something special. I found some amazing ones on Amazon (embroidered nautical) and (white scallop with blue edging).. Another trick to an elegant beach table is to use real silverware. If you don't have enough, go with a high quality plastic.
Elegant Backyard Italian Dinner
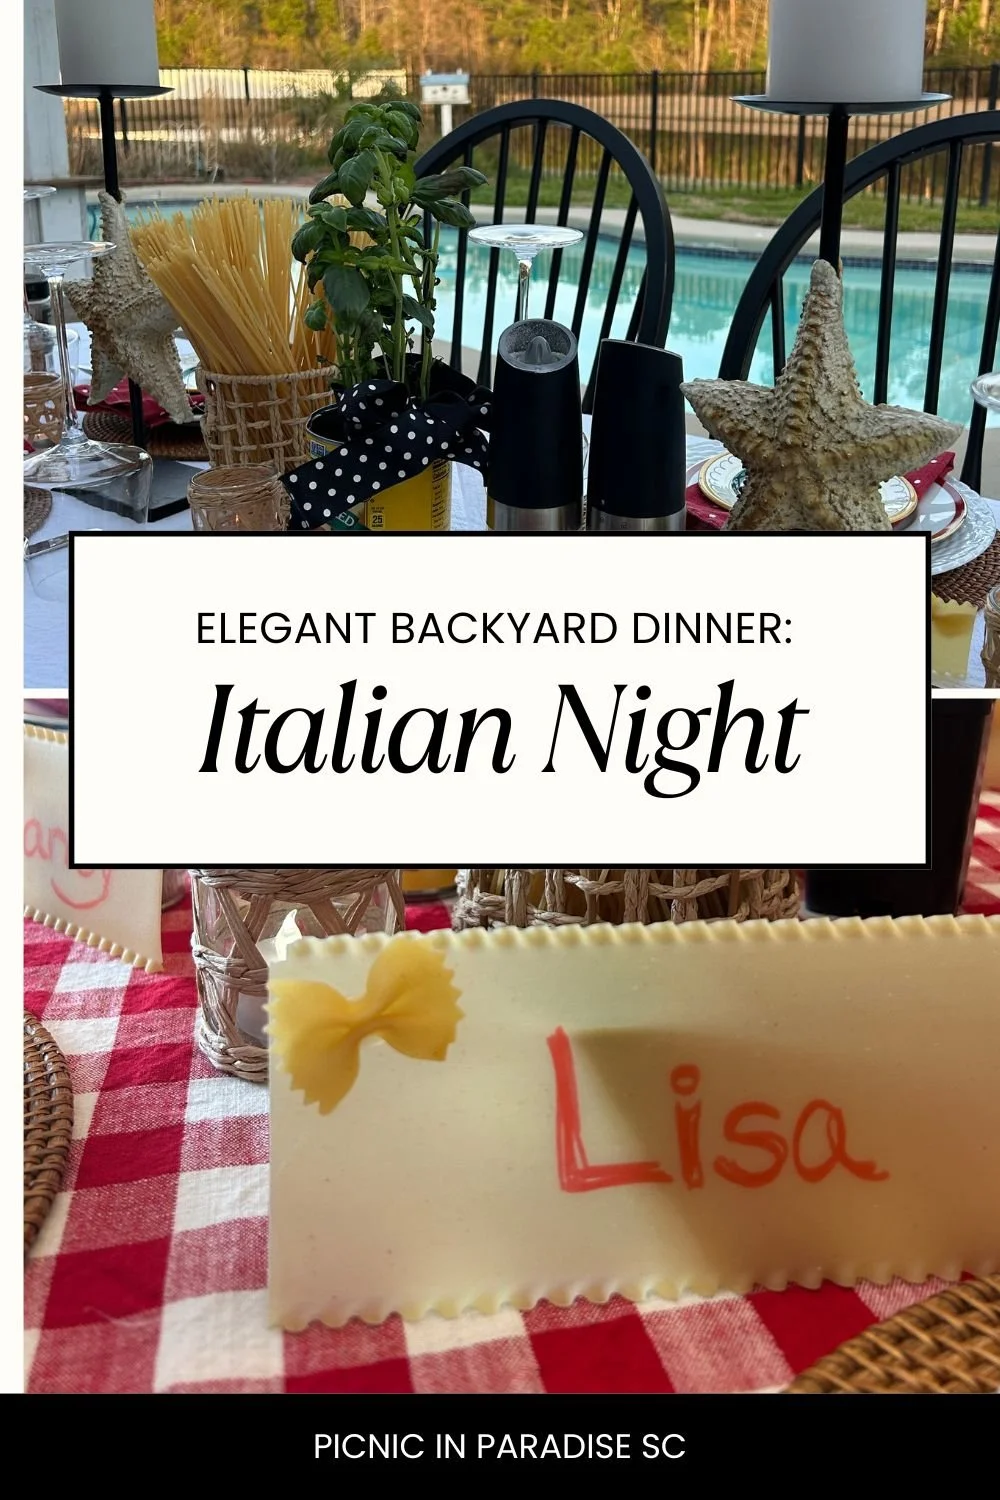
Turn an ordinary Italian Dinner into an Elegant Night
Here are some fun ideas to turn an ordinary Italian Dinner into an elegant evening in your backyard.
Get out the glue gun and add pasta bowties to raw lasagna noodles for name tags. I used a thin marker to write the names. Everyone loved them!
Place spaghetti in small wicker baskets. I picked up mine at Target for $3.
Pick up some basil in the grocery store and place them in cleaned out tomato cans or boxes. I added a polka dot ribbon because I didn’t like seeing the plastic pots.
Use a tablecloth. White is classic Italian or red checks adds a bit more dimension to the table.
It was a little windy so I combined battery operated pillar candles and real tea lights.
Hang battery operated string lights. If your backyard doesn’t have string lights, consider purchasing an over the table rod stand to clamp on the table. I have a pergola and I just drape the lights over the beams.
A friend picked up Chianti at Trader Joe’s and we’ll be keeping the bottle to use as a candle holder for out next dinner -
This post contains affiliate links.
From Beach Day to Date Night: Easier and Cheaper
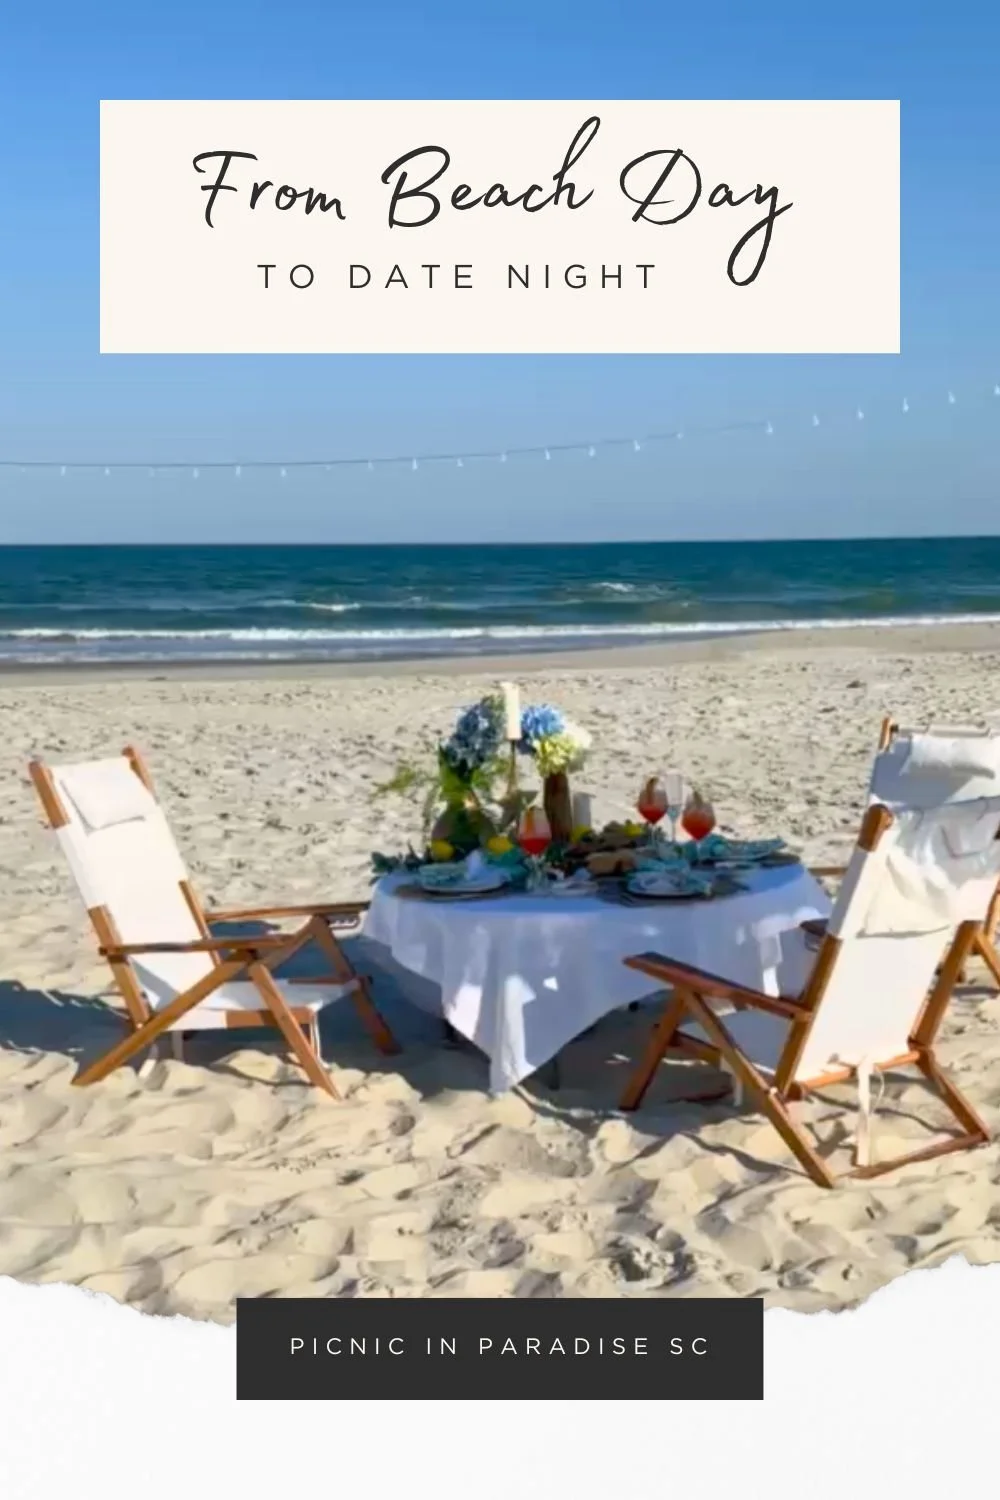
From Beach Day to Date Night
When we set up a dinner on the beach, we haul a slew of things like tables and chairs and high end tableware. If you are looking for a DIY, here’s a way to create that ambiance, with less hauling and friendlier to your budget. Bring your beach chairs and let’s get started!
You need a table. Take a side table from your patio, or look on FB marketplace for something cheap. If you are stuck, this one is practical because you can use it high or low so it will work for a variety of future dinners.
Also need a white cloth tablecloth. Home Goods has a great selection. This one is perfect and a great price! Has to be cloth- that ups your experience tenfold!
Plastic stemware. Use these triton glasses. because they hold up and look fabulous and you can use them at home. There’s something about holding wine glass that just makes you feel romantic. Fill with with a mock cocktail or water with a slice of orange. Trust me , it works!
Candles. You can use tea lights or these pillars.
Once you have those four things in place, you can add paper plates and napkins and order a pizza and you will still feel like you are at a four star restaurant. Have fun!
This post has affiliate links.
What not to do: Cake Decorating Party
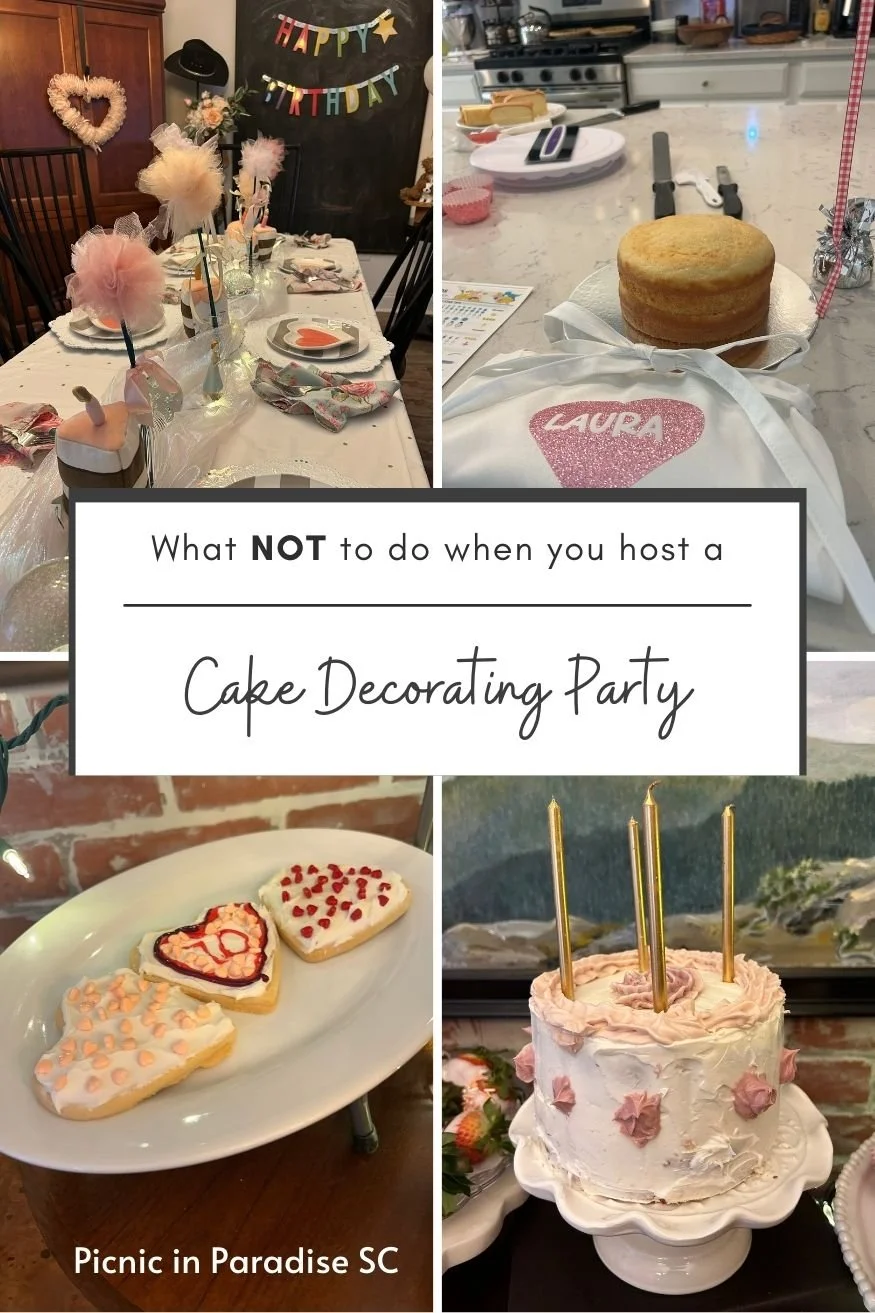
Hosting my own “Decorate your Own Cake” birthday party last week sure did teach me some valuable lessons. It was a small party for 8 women. We all had lots of experience baking, although none of us had ever done creative cake decorating. Even so, I thought it would be fun if I baked some cakes, offered up icing and decorating tips and let everyone have a blast. I added cupcakes and cookies just in case…
I baked ten 4” layers of assorted cake flavors and half a dozen cupcakes, made two pounds of buttercream frosting, bought canned icing and the cookies. What a pain to do all that baking! Everyone loved the cookies and cupcakes but the cakes were a bit overwhelming for most of them. Next time I would just buy cookies and make a couple of dozen cupcakes. Easier, cheaper and still lots of fun! I printed out a chart explaining what the different tips did, but everyone liked experimenting. Don’t bother. Do buy lots of sprinkles, the gals loved using them!
We decorated the cakes on my kitchen counter and then had lunch at a separate table. I thought that worked well but if you don’t have the space, just do it all on the one table. Each person presented their creation to the display table where I had placed small cake plates and tiered plates. That was fun and gave everyone a chance to take pictures and admire each other’s work.
I bought aprons from Amazon and used my Circut to personalize them with everyone’s name. That was a hit and a nice gift to give them to take home.
The table setting combined high and low for sure! The cake was a pillow from Target I use to play tea party with my Granddaughter, heart plates were Pottery Barn (here’s an alternative)and striped plates were Target’s from a past season. I made the flowers from strips of tulle and garden stakes and places them in miniature glass vases. The runner was just fabric I had in the closet and the tablecloth a 2 dollar item from Target. It was a stunning table, if I don’t say so myself. lol
My advice is to keep it simple. Don’t go crazy buying cake decorating tools. If you want, print out some cute cupcake ideas to stir their creativity. I had bought to go boxes, but we didn’t use them. All in all, it was fantastic to get everyone together and share lots of laughter.
Recreate this romantic date night on the beach
Fretting about money but still want to create a romantic date night? You need the tent, string lights, pillows and blanket. Skip the chalkboard and instead write out a special note. Get cupcakes from the local store and place on a tray. Bring blankets for romance and warmth.
How to host your first cookbook club dinner
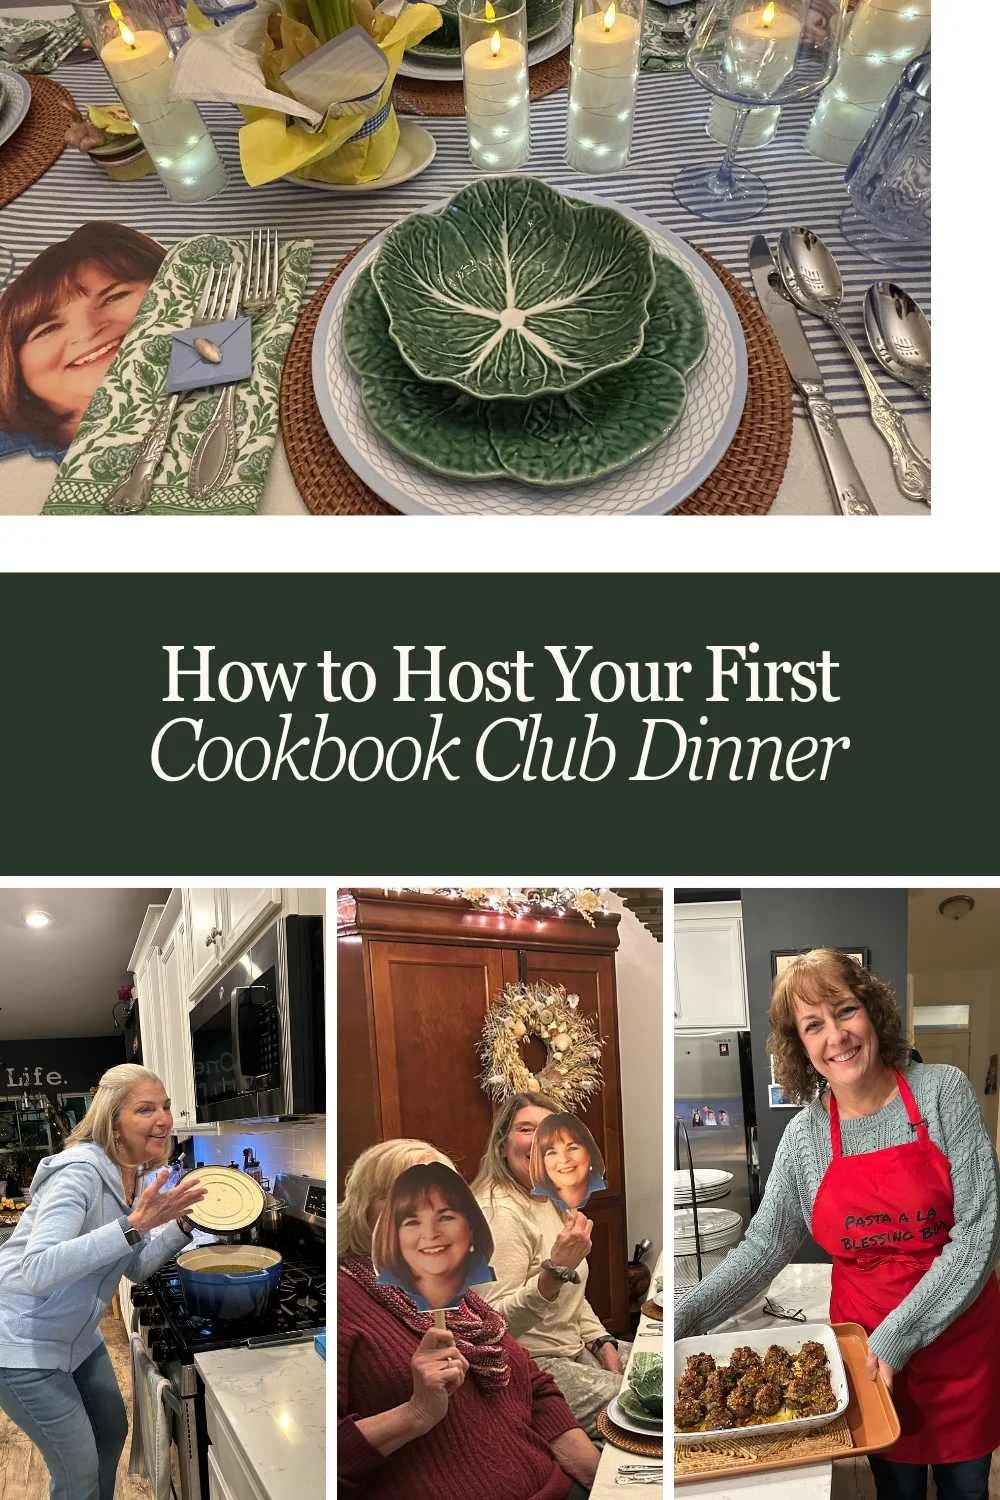
Cookbook Clubs are popping up everywhere and why not? They are the an affordable and delicious way to share a fun night with the girls.
How many people? We decided to keep the number of people between six and eight. That way each person could make a course: appy, soup, salad, entree, veggie, dessert. If there were additional people we’d add an app, less we’d remove soup or salad. Easy.
How to pick the cookbook. We decided to expand the idea to a favorite cook rather than a specific book. We all get our recipes from the internet so it made it easier for us. This month it was Ina Gartner - excellent choice for sure!
How to decorate? Think of this as a homage to your cook and create an atmosphere that reflects their personality. With Ina she’s all about comfortable gatherings of good friends and cocktails. I wanted the vibe to be casual and fun.
I created a Whiskey Sour station (her favorite) with her picture and quote, “Everything tastes better in a martini glass, so that’s what I’m going to serve.” and then we had fun making sure we shook the sours for 30 seconds just like she does.
It was fun to set the table. Staying with a white tablecloth, I added a blue stripe runner to make everything feel crisp and folded green patterned napkins with a hint of blue. Then grounded everything with rattan chargers. I pulled all the colors with the plates - blue and white geometric Corelle and green cabbage plates and bowls. Look in your cabinet and try to mix and match to create your own look. I made copies of her headshot, cut them out, and taped sticks to them so we could be Ina for a night. lol Then picked up some daffodils from Trader Joe’s, added candles and a couple of small blue and white ginger jars. For glasses I pulled blue plastic water glasses and wine glasses.
Don’t be afraid to go high low on your table. Stay away from plastic utensils, but you could use pretty paper plates for a salad plate if it had the right colors and added to the look. The key is to keep it cohesive and not too over crowded. Think Pottery Barn rather than flea market.
Since Ina has a new book, Be Ready When the Luck Comes, I wrote out quotes from it and wrapped them in mini envelopes. Each of us, read one when our course was served and we talked about how it applied to our lives. It was a beautiful way to create a deeper level of conversation and we all felt closer when the dinner was over.
I came from a family of five kids and we always worked together in the kitchen. I had envisioned a cookbook club would recreate that kind of bonding and really did. Next month we are celebrating Valerie Bertinelli.
This post has affiliate links which we can earn commissions. Thank you for supporting us! - Nancy
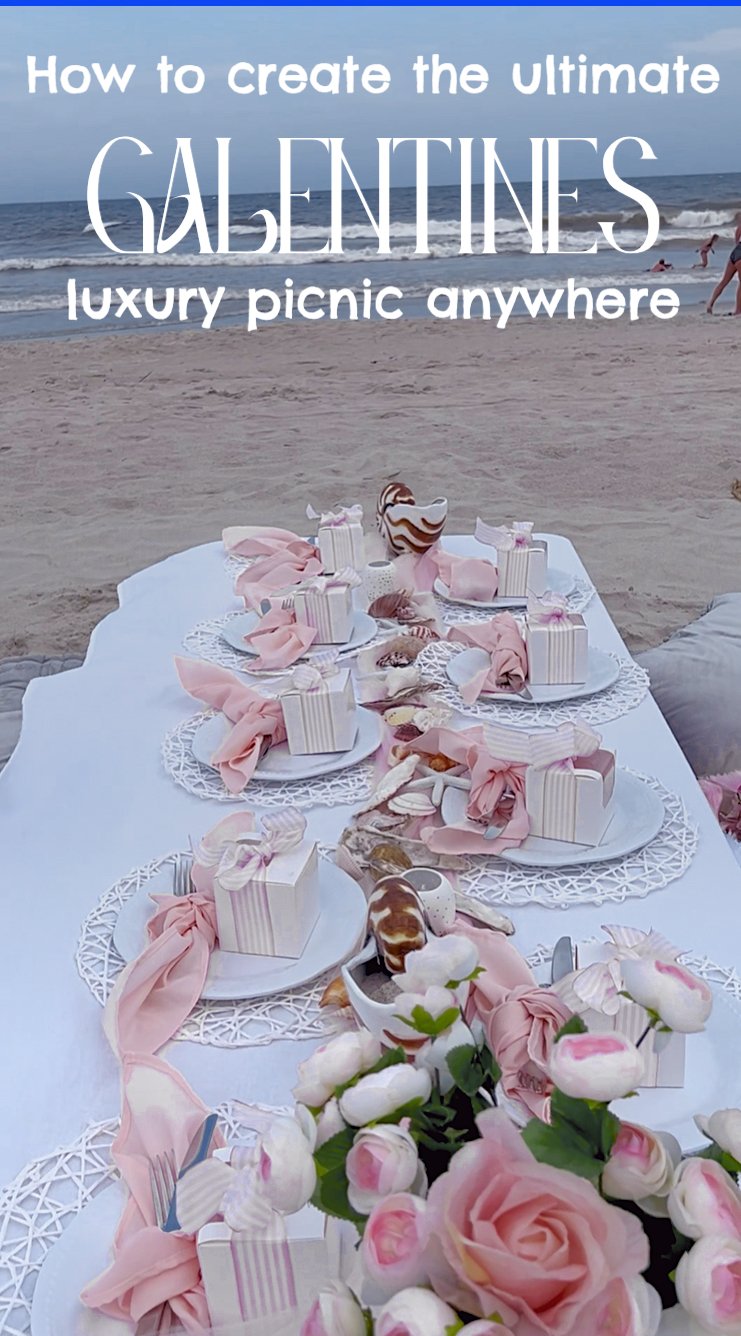
Galentines Luncheon
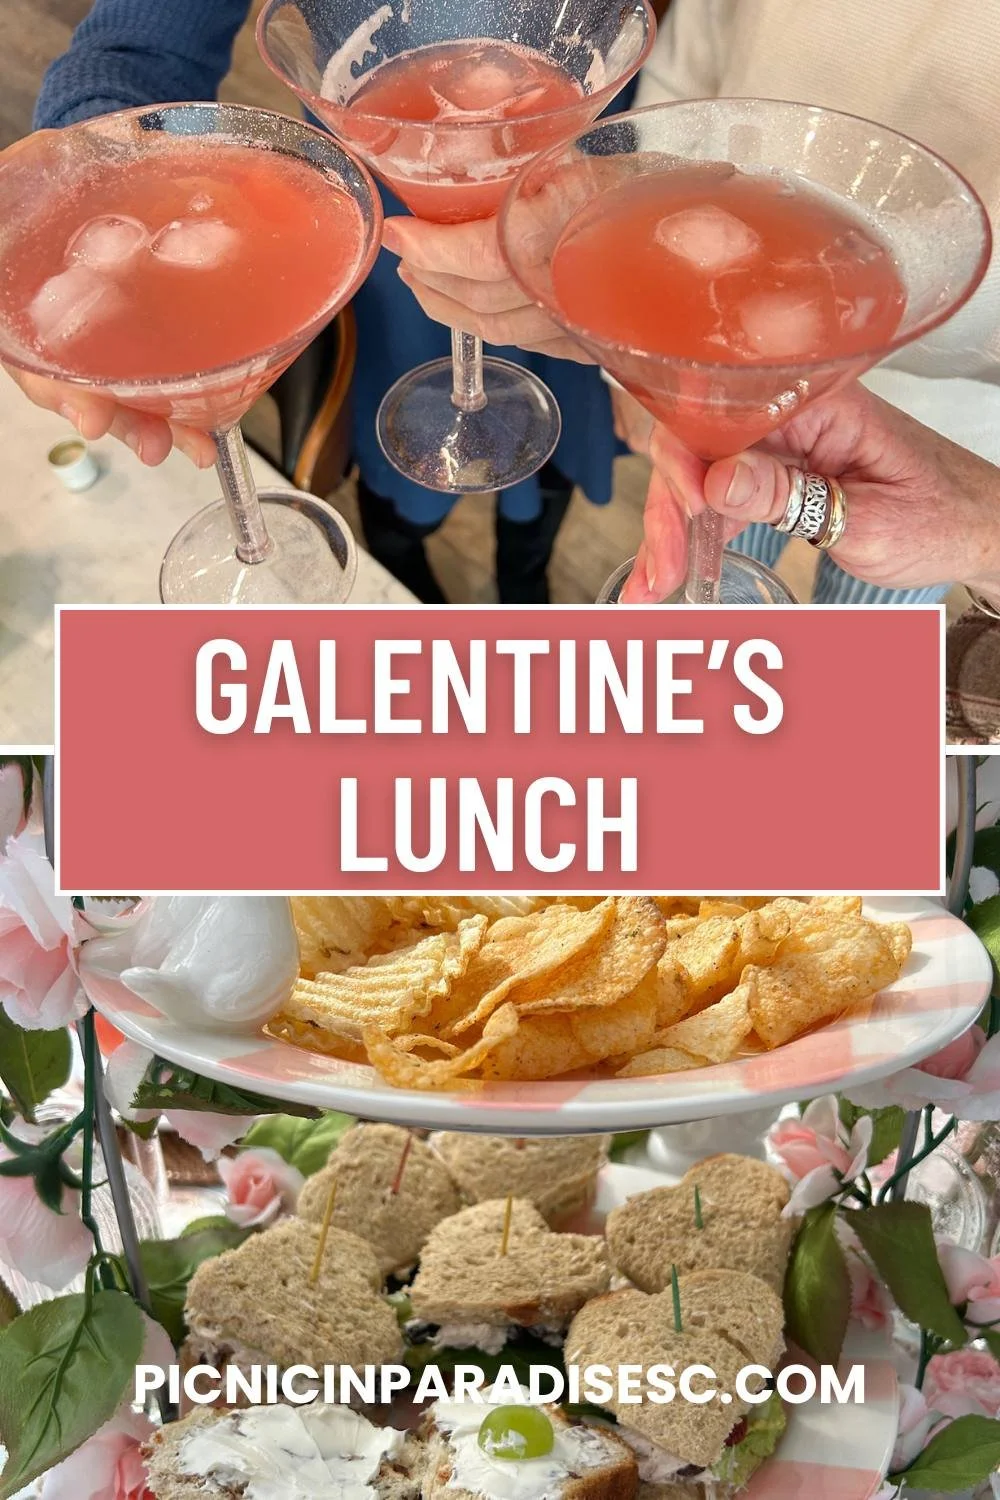
Give your guests the food they love
Sarah over at Flavorful Recipes has made heart-shaped sandwiches for a Galentine's Lunch and I loved the way the heart shaped sandwiches looked, but I wasn’t sure if my friends would like her ingredients. So I improvised and set up a sandwich bar with ingredients I knew everyone likes and let them build their own. It was so much fun I would do it again!
For drinks I offered pink lemonade, champagne, and limoncello and let them make their cocktails in martini glasses — another big hit.
How to set up the sandwich bar:
Pick a main filling (I chose chicken salad; I also had tuna and crab just in case) but didn’t need them.
Thinly slice lots of veggies and put them in heart shaped ramekins (peppers, cucumbers, tomatoes, apples, chives, shallots).
Offer creamy spreads like cucumber dip, cream cheese with chives, mashed avocados , and cranberry chutney.
Put out small bowls of lettuce and spinach.
Provide different breads and heart cookie cutters.
Lay parchment on the counter and label items with pencil. Use fun descriptions to set the mood.
What went well:
The sandwich bar created a fun bonding experience. Everyone had fun sharing their creations and was excited to taste their creations
The cocktails were perfect. The lemonade was perfect for non-drinkers and everyone else had fun making different combinations
The table setting created a casual yet beautiful experience. The round table, candles, small bud vases was perfect and set the mood for fun conversations.
What needs work:
I didn’t love the way the sandwich bar looked. I think I’ll play with stations next time so people don’t have to wait to cut their bread.
I also think I’ll try different cutters just to add to the fun.
We had planned for crafts after lunch, but the sandwich bar was plenty and we never got to crafts. lol
There were lots of leftovers — maybe I’d have everyone make extra to bring home and maybe have takeout lunchboxes for them.
This post contains affiliate links. Thank you for supporting us.
DIY Cozy Table for Two
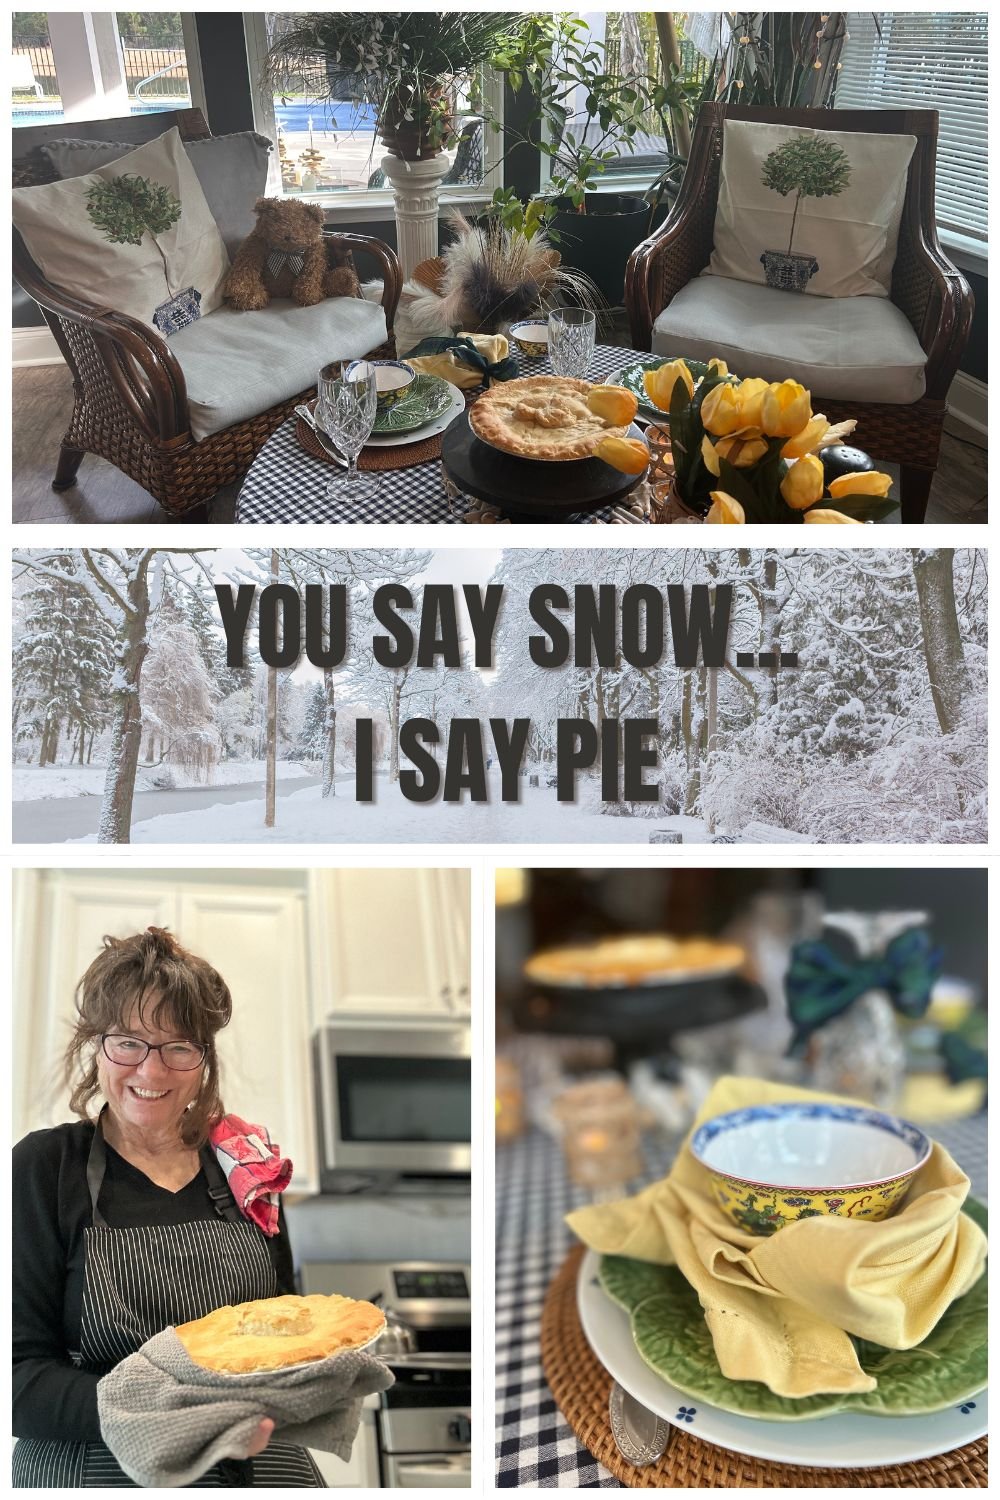
How to DIY your own cozy dining spot for two
As retirees we don’t always stick to eating meals at the dinner table. Most nights we are plopped in front of the TV catching up on our newest binge watch. lol So a nice alternative for us is to change it up and move to our morning meditation spot and turn it into a cozy dinner for two.
Here are some suggestions and links to help you DIY your own spot.
Cover your table with a tablecloth and it instantly begins the transformation. I used this one from Pottery Barn but any cotton or linen one will work.
Bring out the dishes and layer them on a rattan charger. I use my chargers year round. Don't be afraid to mix and match your plates. The trick is to keep the color scheme and don’t be afraid of different prints.
Use cloth napkins- I like these yellow cotton ones because they are a great price and wash well.
Keep the food hot and simple. This was a chicken pot pie I made from Costco’s roast chicken. I cheated and used pie crust and crescent rolls for the top. Next time I’m going to pile on the carbs by using stuffing on the top!
Add candles.. always candles. I usually use the battery operated ones.
I like to have blankets available and cozy slippers too.
Turn off the phones and tv and sit back and relax with your favorite person.
This post has affiliate links. Thank you for supporting our small business.
How to create the best Anniversary
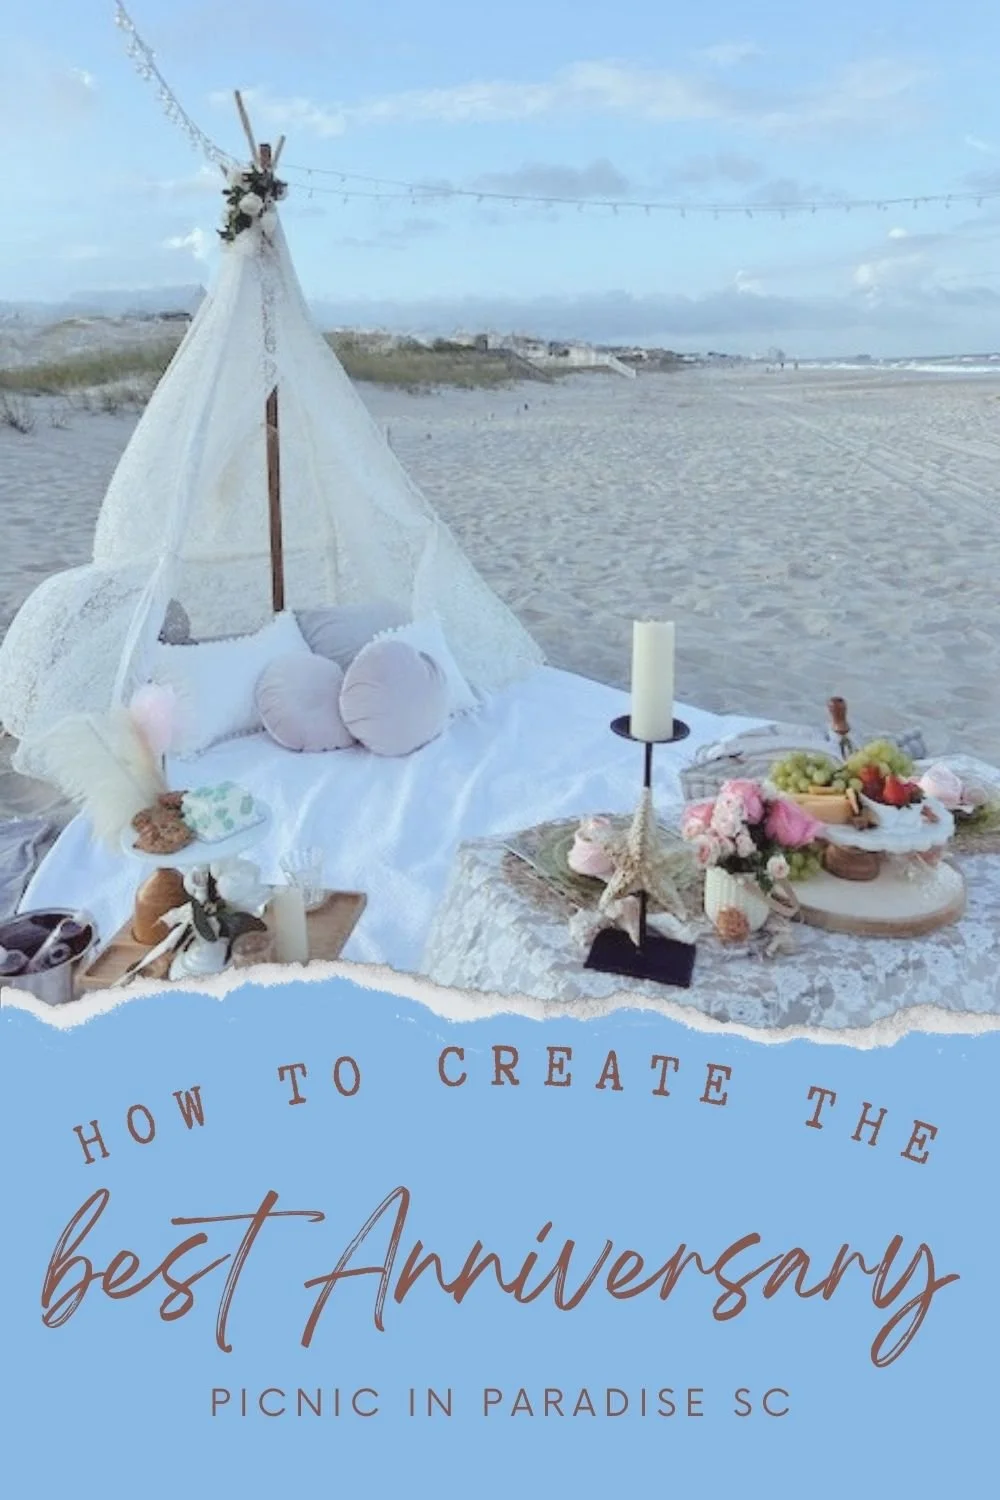
Recreate the feeling of when you first fell in love…
Of course we can set up an amazing anniversary celebration on the beach for you, but if you have more love than money, here’s how you can DIY and save enough money for a bit of sparkly.
Create a cozy niche. We use a lace teepee but you could also outline your blanket with battery operated string lights to create a visual nook.
Bring a comforter and comfy pillows. Take them from your couch and/or guest room bed. If you want to rate a cohesive color scheme buy inexpensive pillow covers. I love these velvet ones.
Use a large tray, bed tray, or a tray like this one that holds your stemware. Decorate with battery operated candles, and a bud vase with sweetheart roses (buy day old in your grocery store) and plastic stemware ( I say buy good ones that you can reuse for more special events you want to celebrate).
For food, keep it simple. Order sandwiches or go to the grocery store and buy fresh fruit and a ready-to-go charcuterie pack. When you get to the beach transfer them to a cake plate or something pretty.
Make a playlist with your favorite songs throughout your relationship and play on a small bluetooth speaker or just put your phone in a plastic cup.
Then sit back and relax with no distractions and let the rhythm of the ocean transport you back to when you first realized you were ment for each other.
This post contains affiliate links. Thank you for your support.
DIY Beach Wedding Vow Renewal
Speak your heart.
If you decide to renew your wedding vows and find that you have more love than money, then consider a DIY. Create the atmosphere by creating a heart using 100 tea lights. The trick to getting that perfect heart shape is to outline it with a stick before you start. As far as your vows, keep it simple and sincere. And maybe tuck a few tissues in your sleeve. Bring a bluetooth speaker to dance to your original wedding song or one that reflects your relationship now. Don’t worry about flowers, after your vows take a troll along the beach and pick up a shell to remember the day.
Of course, if you want to avoid the work of set up, we can help. Just let us know.
Top Five Items for Beach Breakfast Picnic
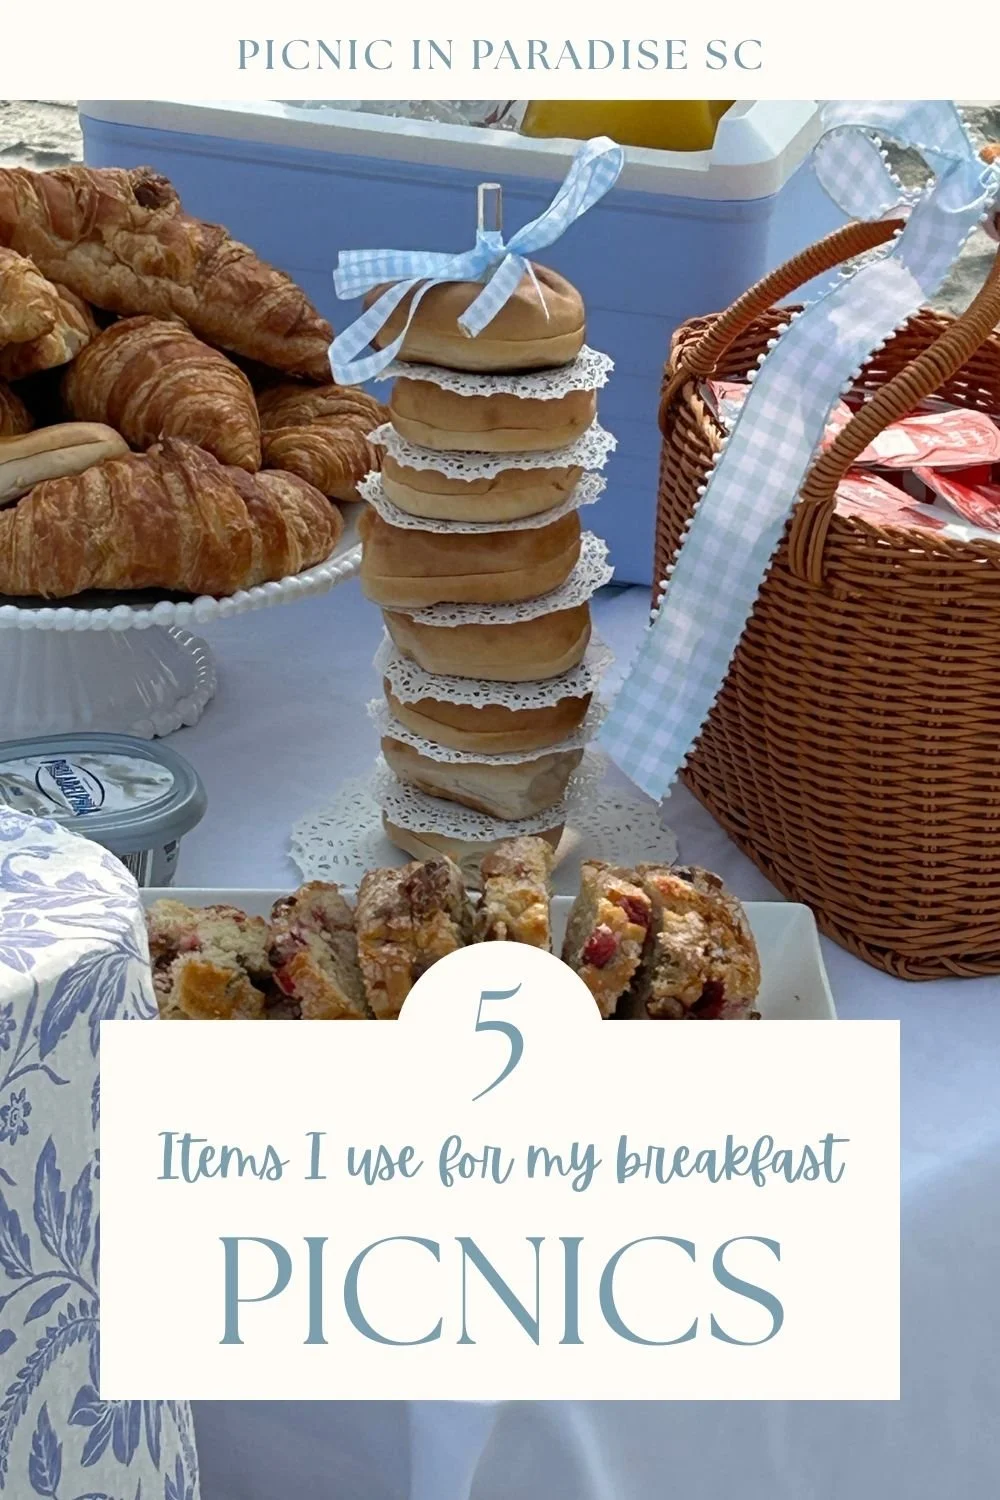
Small is Better
When you set up a luxury beach breakfast, it’s always best to use small serving pieces that work hard. Think of a basic breakfast with croissants, brie, bagels, cream cheese, yogurt, sweet bread, orange juice, coffee. That’s a lot of things to try to fit on a small table. Here are a few items I have found to be “beach tested” and gorgeous. Set your table with a plain white table cloth. White is always crisp and clean and perfect for your base. Let your food add the color.
Basket for yogurts. Place a small ice pack on the bottom and stack yogurts. Tie a pretty ribbon to add color
White melamine cake plate for croissants. This is my favorite. I also use this for sunset picnics with cheese and fruit. White is classic and although a little pricey, it is well worth it. Check Home Goods as well.
Donut holder. This was a game changer for my parties. It doesn’t take up any room and looks so adorable! Stack with small doilies between bagels and tie a pretty bow on top.
Three tier serving tray for fresh fruit. Love this one because it collapses for easy transport and the metal frame can be used facing left, right or centered. In the picture to the left, I pulled one dish out and used for sweet breads.
Small cooler for ice. I bought the one pictured at Target but it was seasonal. If you can’t find it try this one. Fill with ice and keep your OJ cool as well.
This post contains affiliate links
Why most beach picnics fail
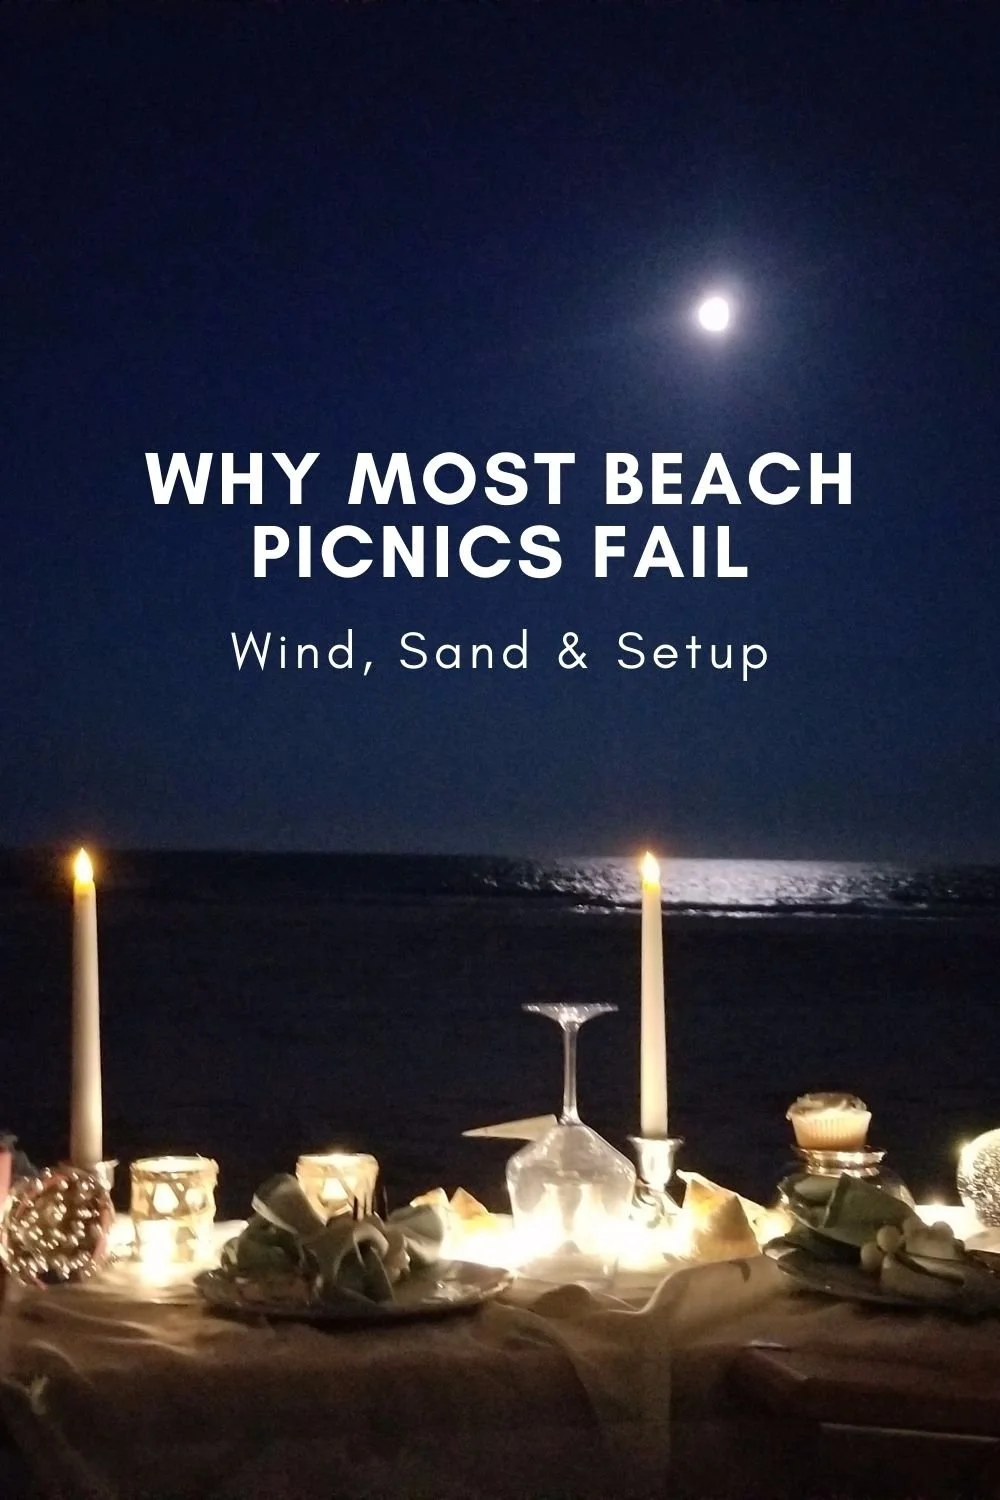
Don’t let the wind get you down
Whenever you plan a beach picnic you can pretty much count on wind. And if there’s no wind, then you better bring bug spray! Here are some quick tips to make sure your table doesn’t blow away.
Fill your vases with sand instead of water. Place stems in floral tubes then insert. If you have a large bouquet, wrap it with wet paper towels and foil then insert them.
Wrap your flatware with napkins or napkin ring and place on your plates.
Use balloon weights to hold down stemware
Use silver candle holders for tapers, tea light holders, and battery operated lights
Sometimes I also use decorative glass weights and they look gorgeous on the table as well
Bonus Tip: Leave your crackers in the cellophane package until last minute - the salt air will wilt them like crazy!
Luxury Picnic Checklist
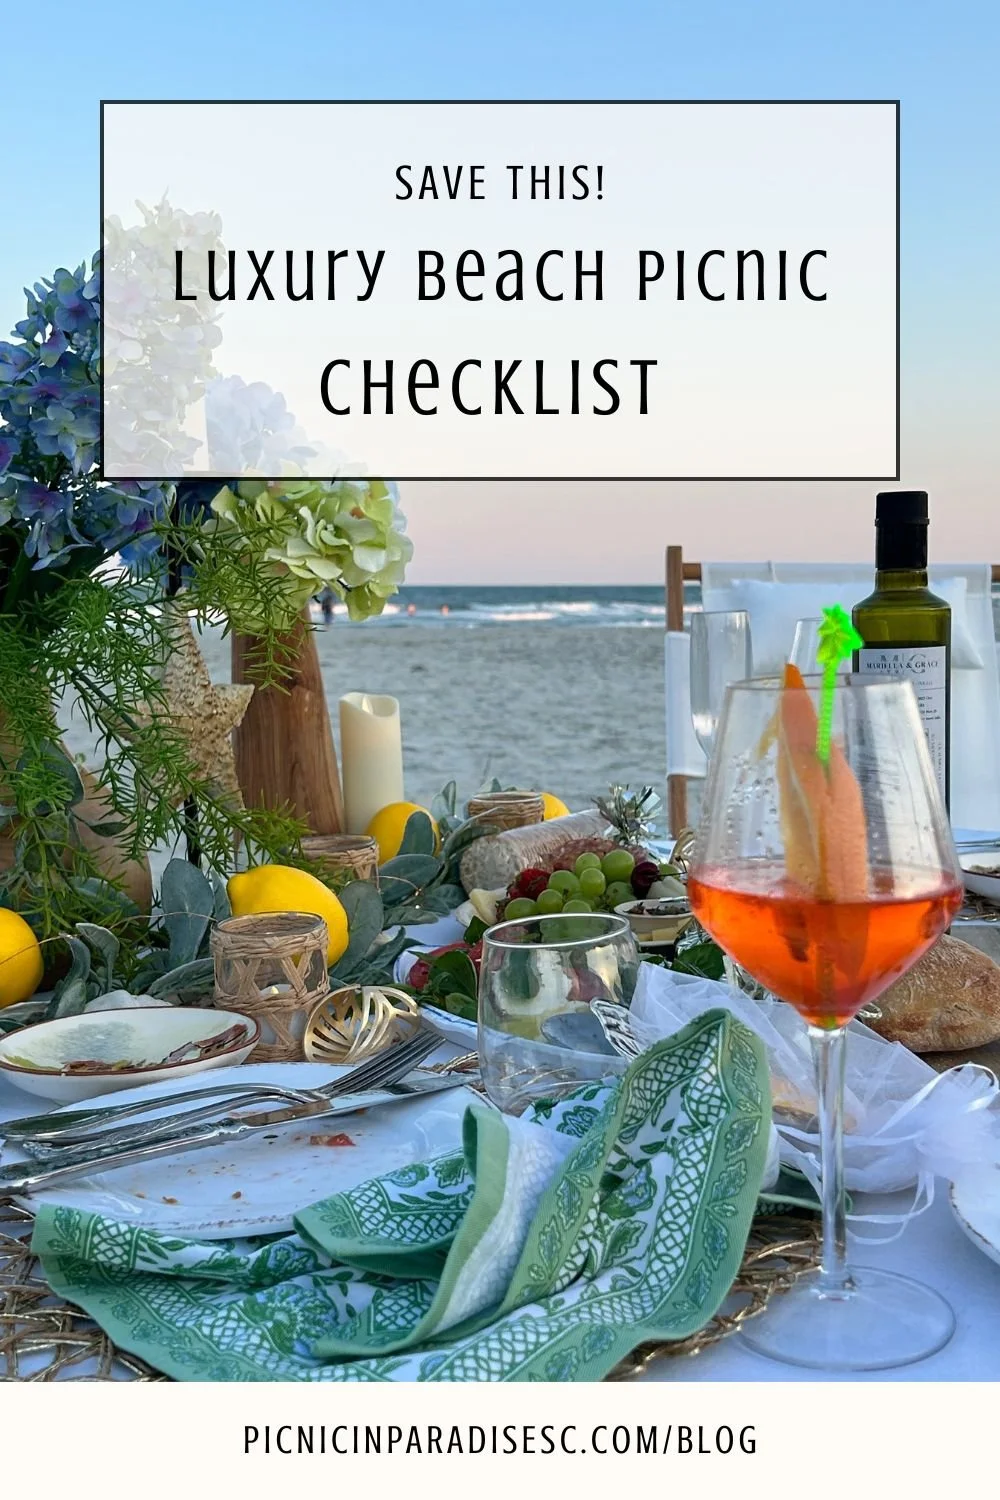
Looking to host your own luxury beach picnic?
Here’s a checklist for you:
Select a quiet beach; check tides, necessary permits; and plan for the golden hour
Use low wooden table or polished tray tables and place pillows on beach towels
Set table with melamine plates, cloth napkins, tablecloth/runner, Tritan stemware and lots of candles
Keep the food simple with cheeses, fruit, nuts, crackers, bread with olive oil
Drinks- check local ordinances about alcohol. Remember beaches don’t allow any glass
Curate playlist and bring bluetooth speaker
Pack bug spray, sunscreen, and additional blankets
Bring garbage bag for a no trace cleanup
This post uses affiliate links.
How to create a luxury Galentine’s Day picnic
How to Create a Luxury Galentine’s Day Picnic
A Valentine’s Day picnic is a great reason to gather friends. Host it anywhere — if the beach is too cold, move it indoors. Cover the coffee table with a cloth, push couches back, and spread pillows to create the right vibe. Use a low table so it feels like a picnic, not a regular party.
Did you want to replicate this picnic? Here are some links to similar items we’ve used for the picnic to the left.
This post includes affiliate links.
Four steps to create the perfect luxury beach picnic
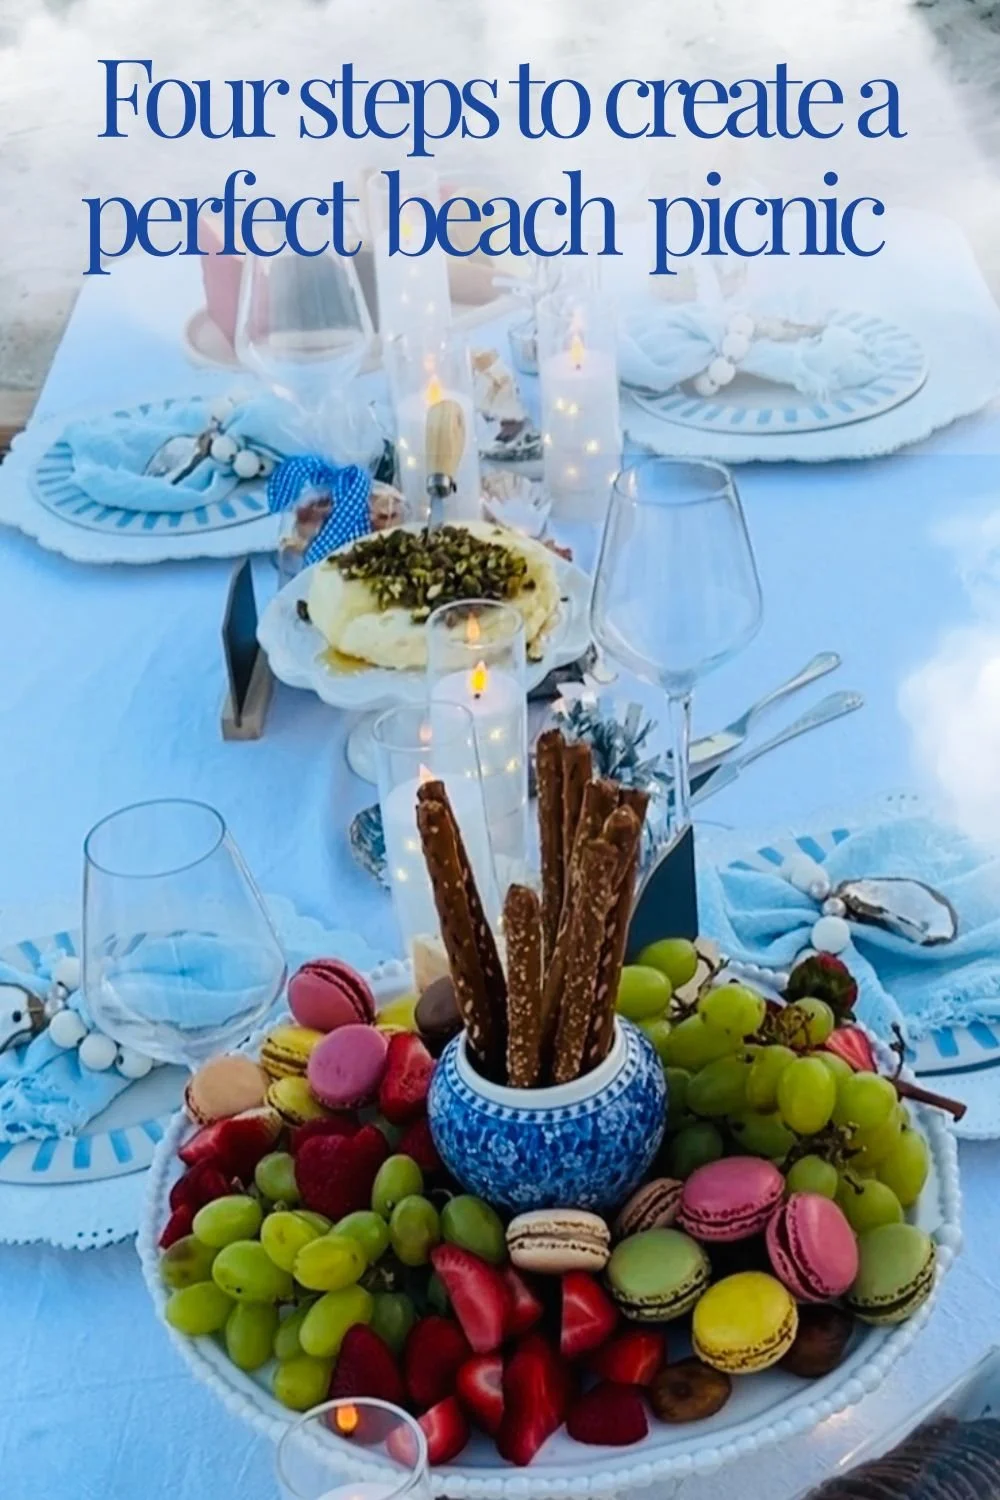
We all live busy lives so if you are going to get together with your best friends, why not make it night to remember? These four easy steps will help you create a memorable experience for sure!
Step One: Visualize Decide the mood and purpose of the evening. Are you aiming for relaxed conversation, a photo-worthy celebration, or a romantic sunset for two? Choose a color palette and a few focal pieces (blanket or low table, cushions, a light centerpiece) to create a cohesive look without overthinking details. Pick a beach spot with easy parking and a comfortable sunset view, and check tide times and local rules. Consider the timing: arrive 30–45 minutes before sunset to set up and capture golden-hour light.
Step Two: Send invites Keep it simple and clear. Share the who, what, when, where, and any special notes (bring jackets, shoes for walking, or a small blanket). Use a group text, a quick email, or an event on your favorite app—include a map pin and a backup plan in case of bad weather. Ask guests to RSVP so you know numbers for seating and food. If the event has a theme or a color scheme, mention it so guests can coordinate if they want.
Step Three: Order food, consider having it delivered to the beach to save you time. Or if you’re making your own, choose food that travels and can be enjoyed at room temperature. Build a mix of flavors and textures: a main finger-food option (sandwiches, wraps, gourmet flatbreads), a variety of small bites (cheeses, charcuterie, olives, nuts), fresh fruit, and an easy dessert (cookies, brownies, or macarons). Include one or two crowd-pleasing special items—something a bit elevated, like a flavored hummus, marinated olives, or a signature sweet. Pack items in reusable containers or disposable trays for easy serving. Don’t forget beverages (sparkling water, a signature cocktail or mocktail, wine or canned cocktails) and enough ice or coolers to keep things chilled. Order ahead from a local deli, bakery, or catering service if you prefer not to prepare it yourself.
Step Four: Set the table and enjoy Arrive early to lay out your base: a large blanket or rug, cushions or low seating, and any tables or trays. Group food by type for easy grazing and place napkins, plates, utensils, and trash bags within reach. Add ambient touches—battery operated candles and string lights; shells or a small vase with seasonal flowers—to enhance the atmosphere without fuss. Keep music low and portable if desired. Once everything’s set, relax and be present: welcome guests, guide them to the setup, and let the evening flow. Take photos during golden hour, savor the food and conversation, and leave the beach as tidy as you found it.
If you’d like to replicate this picnic I’ve included links. FYI some are affiliate links.
Low Table and Tablecloth
This camping table is easy to carry because the top rolls up and fits in a carrying bag. Fits four nicely. Use a table cloth over it to dress it up if you want.
I like plain white tablecloths. They create a nice base and you can reuse with almost any color theme. This is 2 pack is very affordable.
Plates
If you are only gingerbread to do one picnic and never eat out on your patio then go ahead and get white plastic plates and dispose of them. But if you like to eat outside, consider buying a nice set of melamine plates. They look great and are dishwasher safe and will last you several seasons. I always go with white. They are versatile and will lend themselves to any theme by changing up napkins and flowers. I like these white beaded plates because they are classic.and you can pair any color salad plate to add color. The salad plates pictured are from Belks from last summer. They are on super sale until they are gone. I love all three sets!
But the trend for the wavy border is wonderful and if you are looking for those, try these will look great.
Stemware
Go with Tritan & BPA free (glass is a no noo on the beach). I like the stemware but if you prefer stemless, go with that. I use to buy Pottery Barn’s stemware but have switched over to this Amazon brand and never looked back.
Flatware
Flatware can take your picnic to another level. We use to use silver but now a days so many people don’t like the metal taste. Looking for a great set? This Wallace Hotel Lux is by far my favorite and it lasts!!!
If you prefer not to use flatware, this set is has everything you need to serve your food. It even includes labels for your cheeses!
Table Accessories
I use melamine cake plates, cupcake holders, anything that will add a little dimension to the table. If you are ordering food in containers try using a try level serving plate.
This pedestal stand is my go to.. It’s large enough to stack another one on top. I also use these metal stands to stack other alone. I always have my eyes open at Home Goods. The pretzels are in a little ginger jar vase. I bought a set of four and use them all the time for flowers, food and just a dab of color. They are porcelain but they are solid and don’t break like glassware.
Candles.
I have fallen in love with these candles from Amazon because you can see them in the daylight and they look fabulous after dark. I always used the pillar candles but they only came alive after dark and I always suggest picnics start at the golden hour. This set was a game changer!
Okay, I think that’s it. If you have any questions, feel free to email me and I’ll help you the best I can. Thanks- Nancy
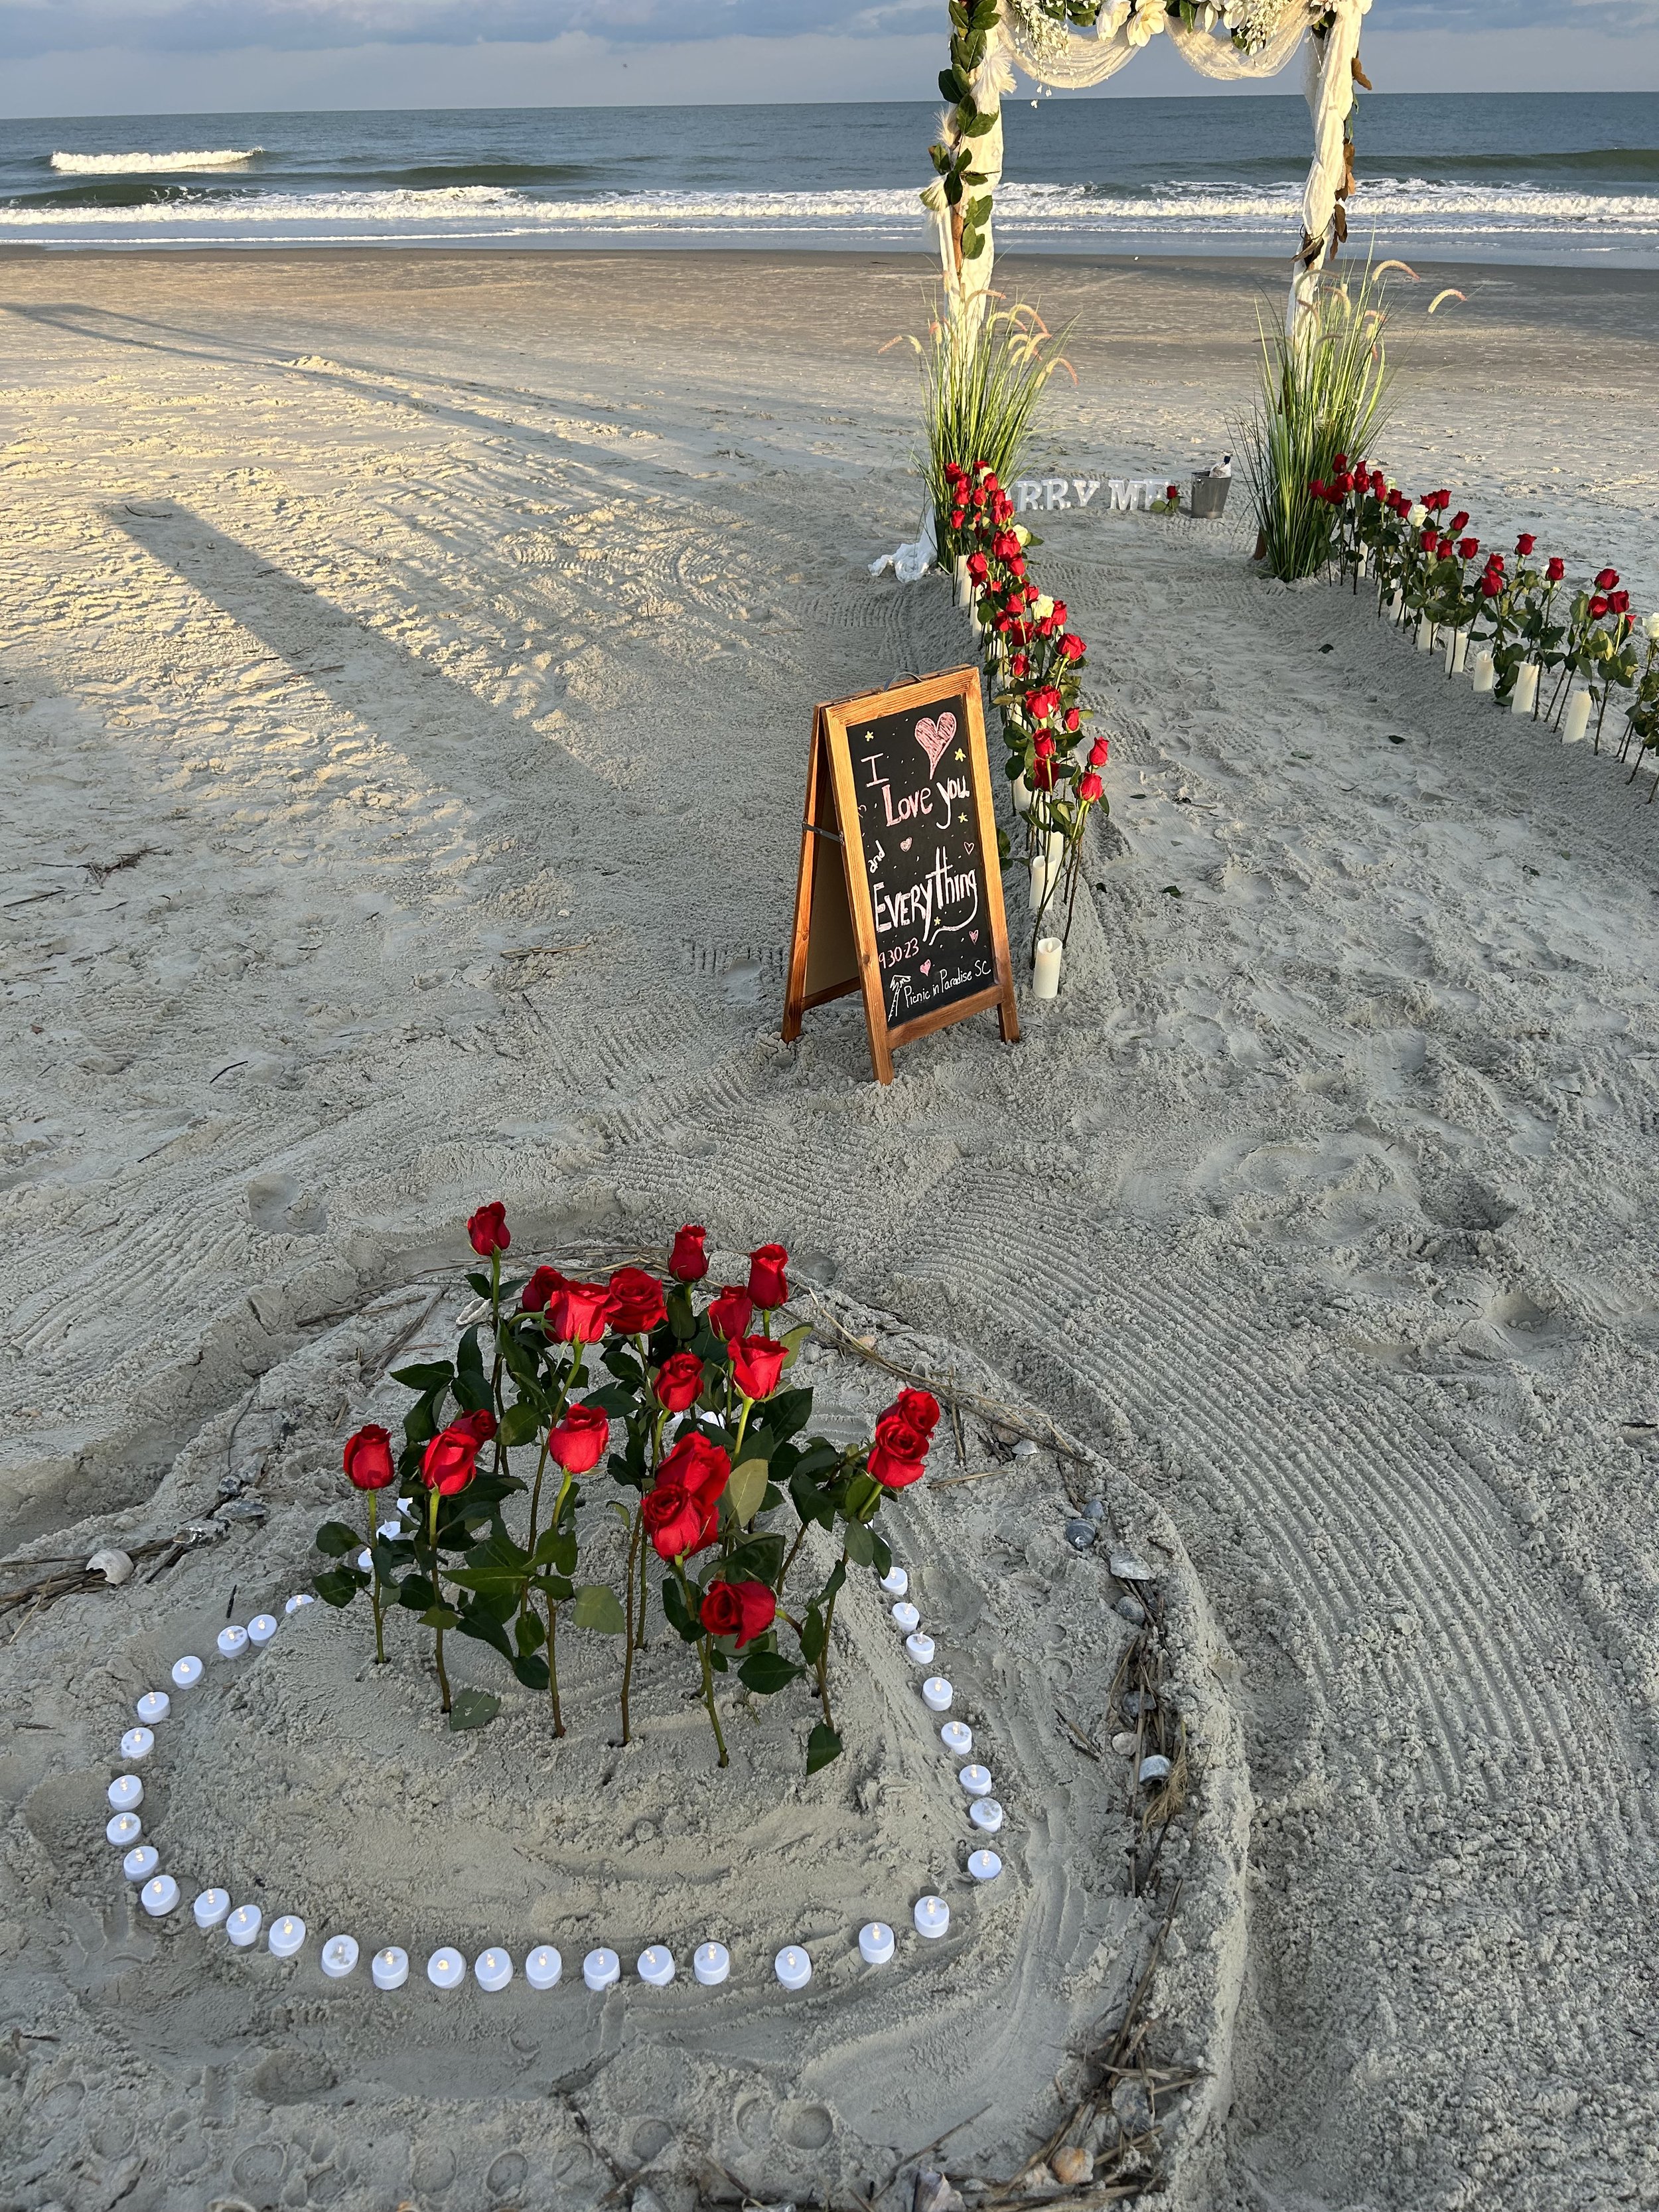
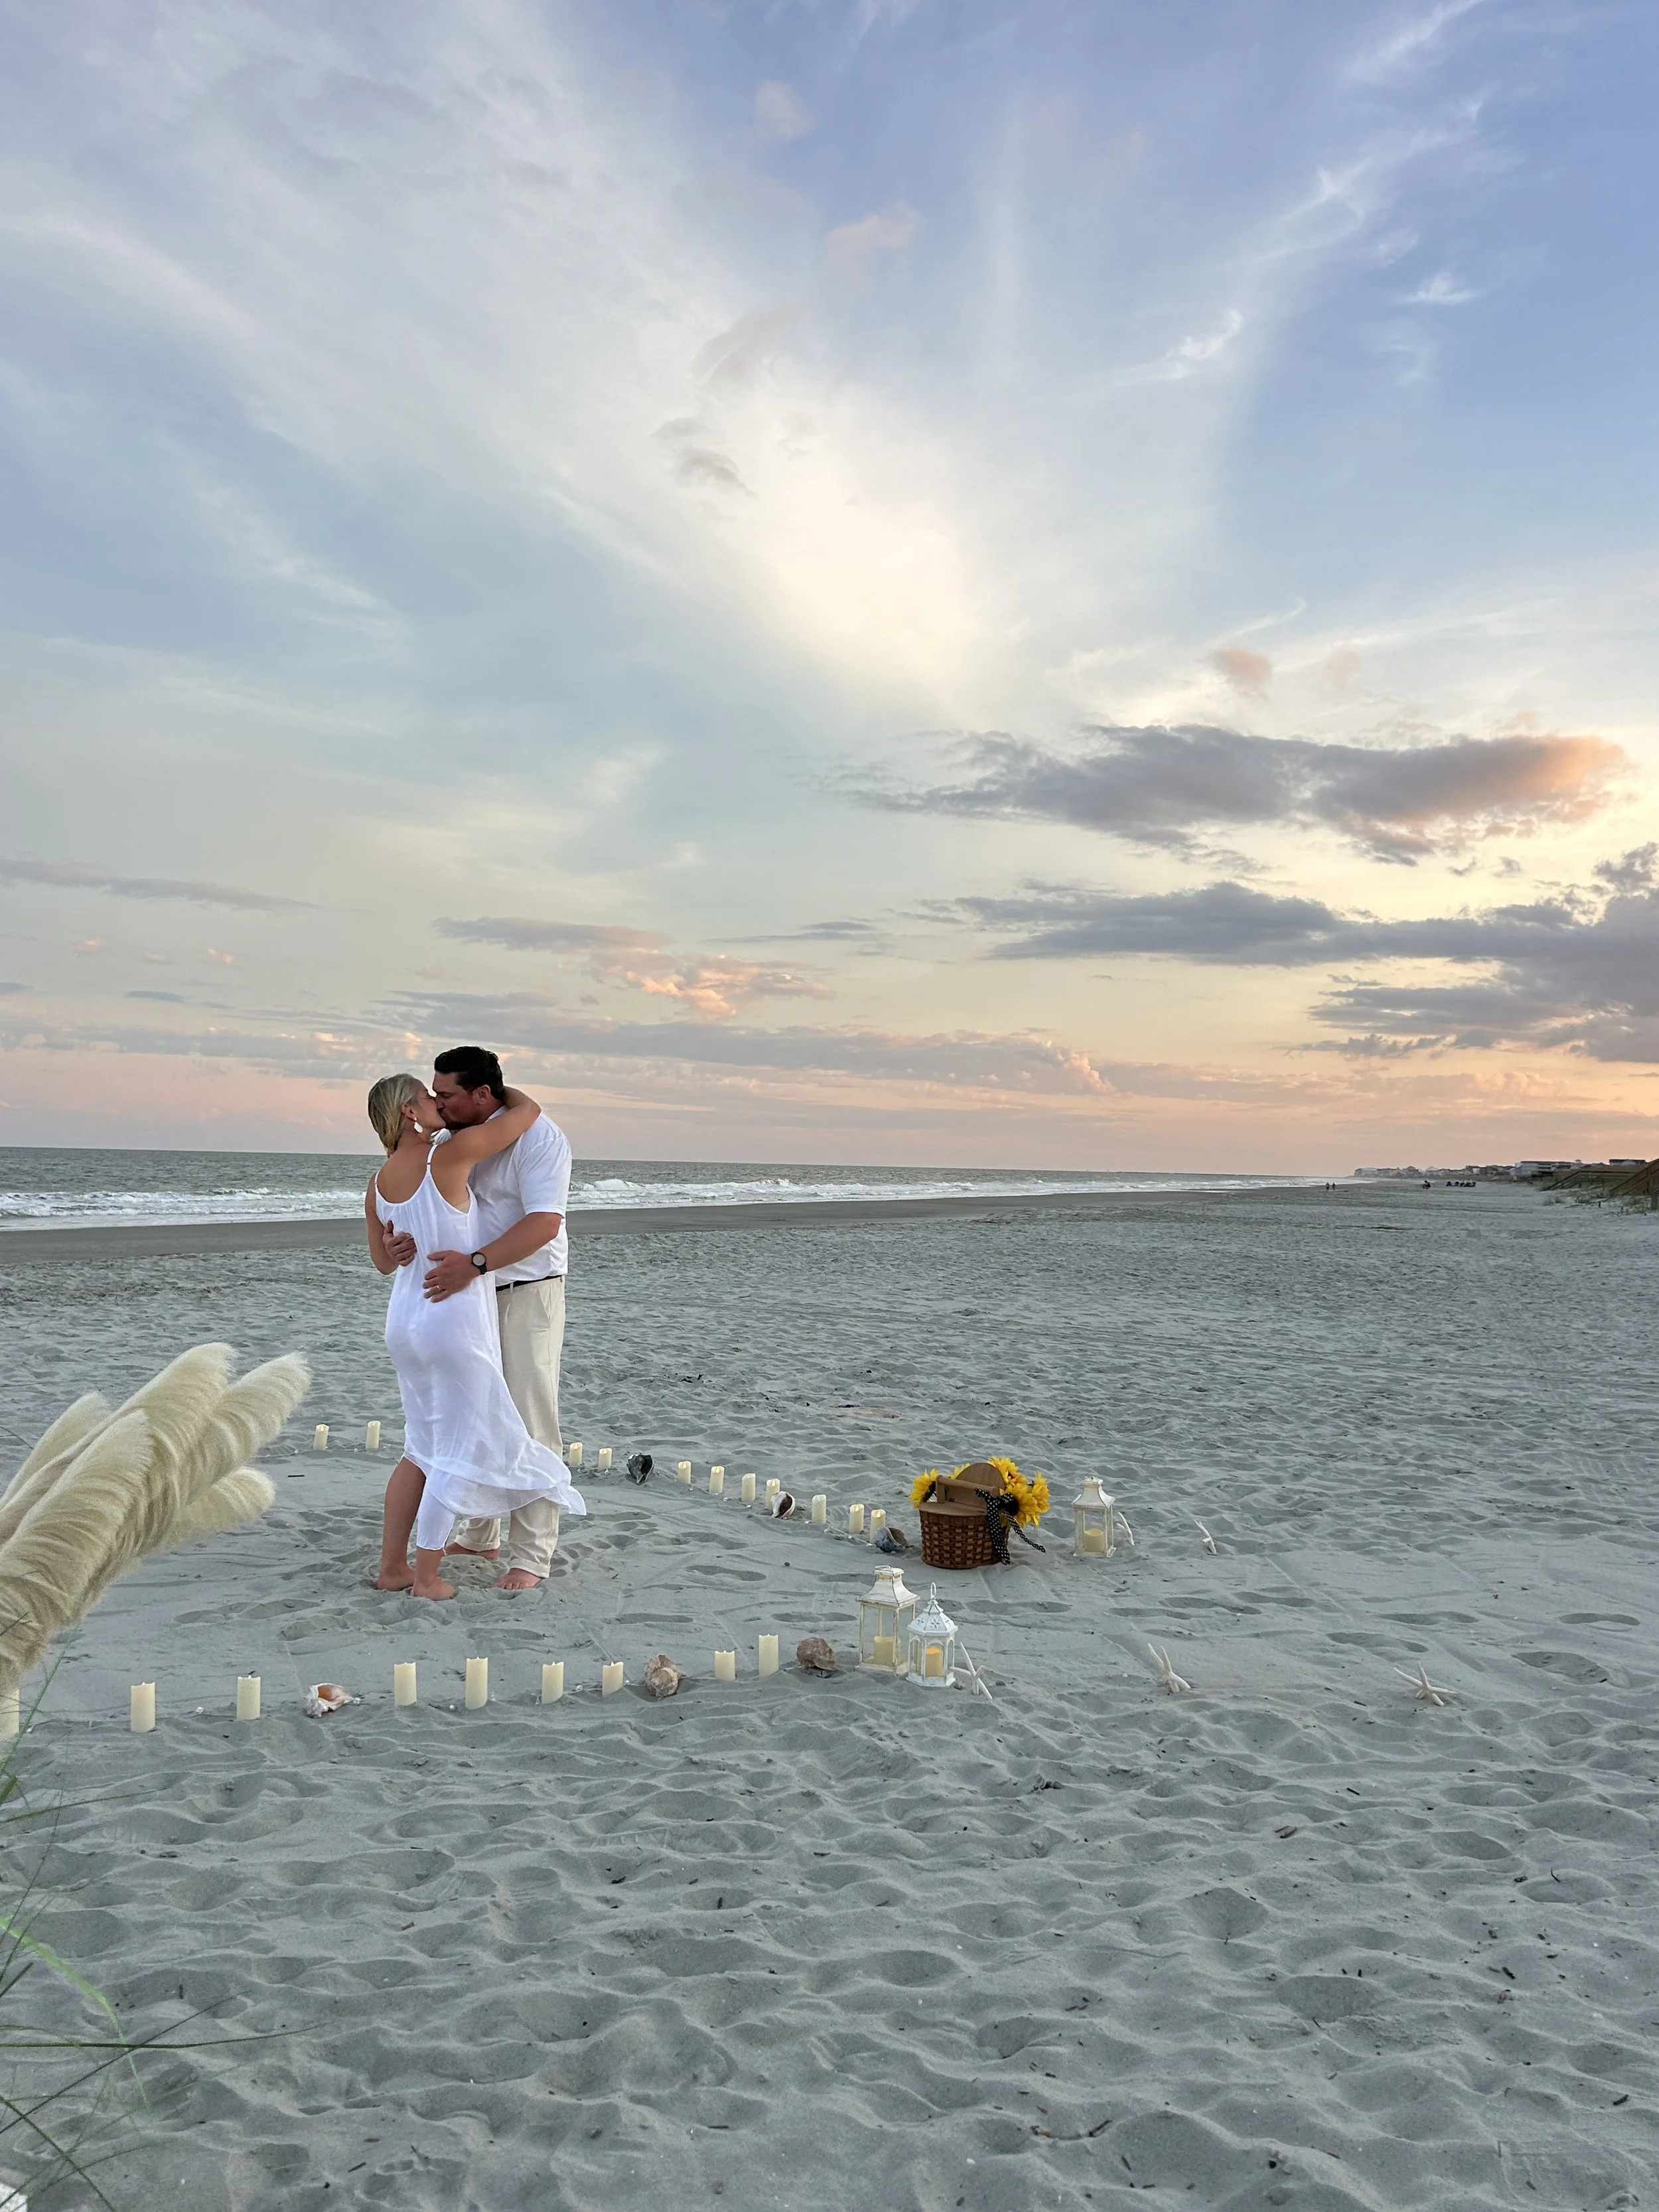
How to avoid a disaster proposal story
Your proposal should be a day to remember. These 10 tips will help ensure your day is memorable - in the best way possible!
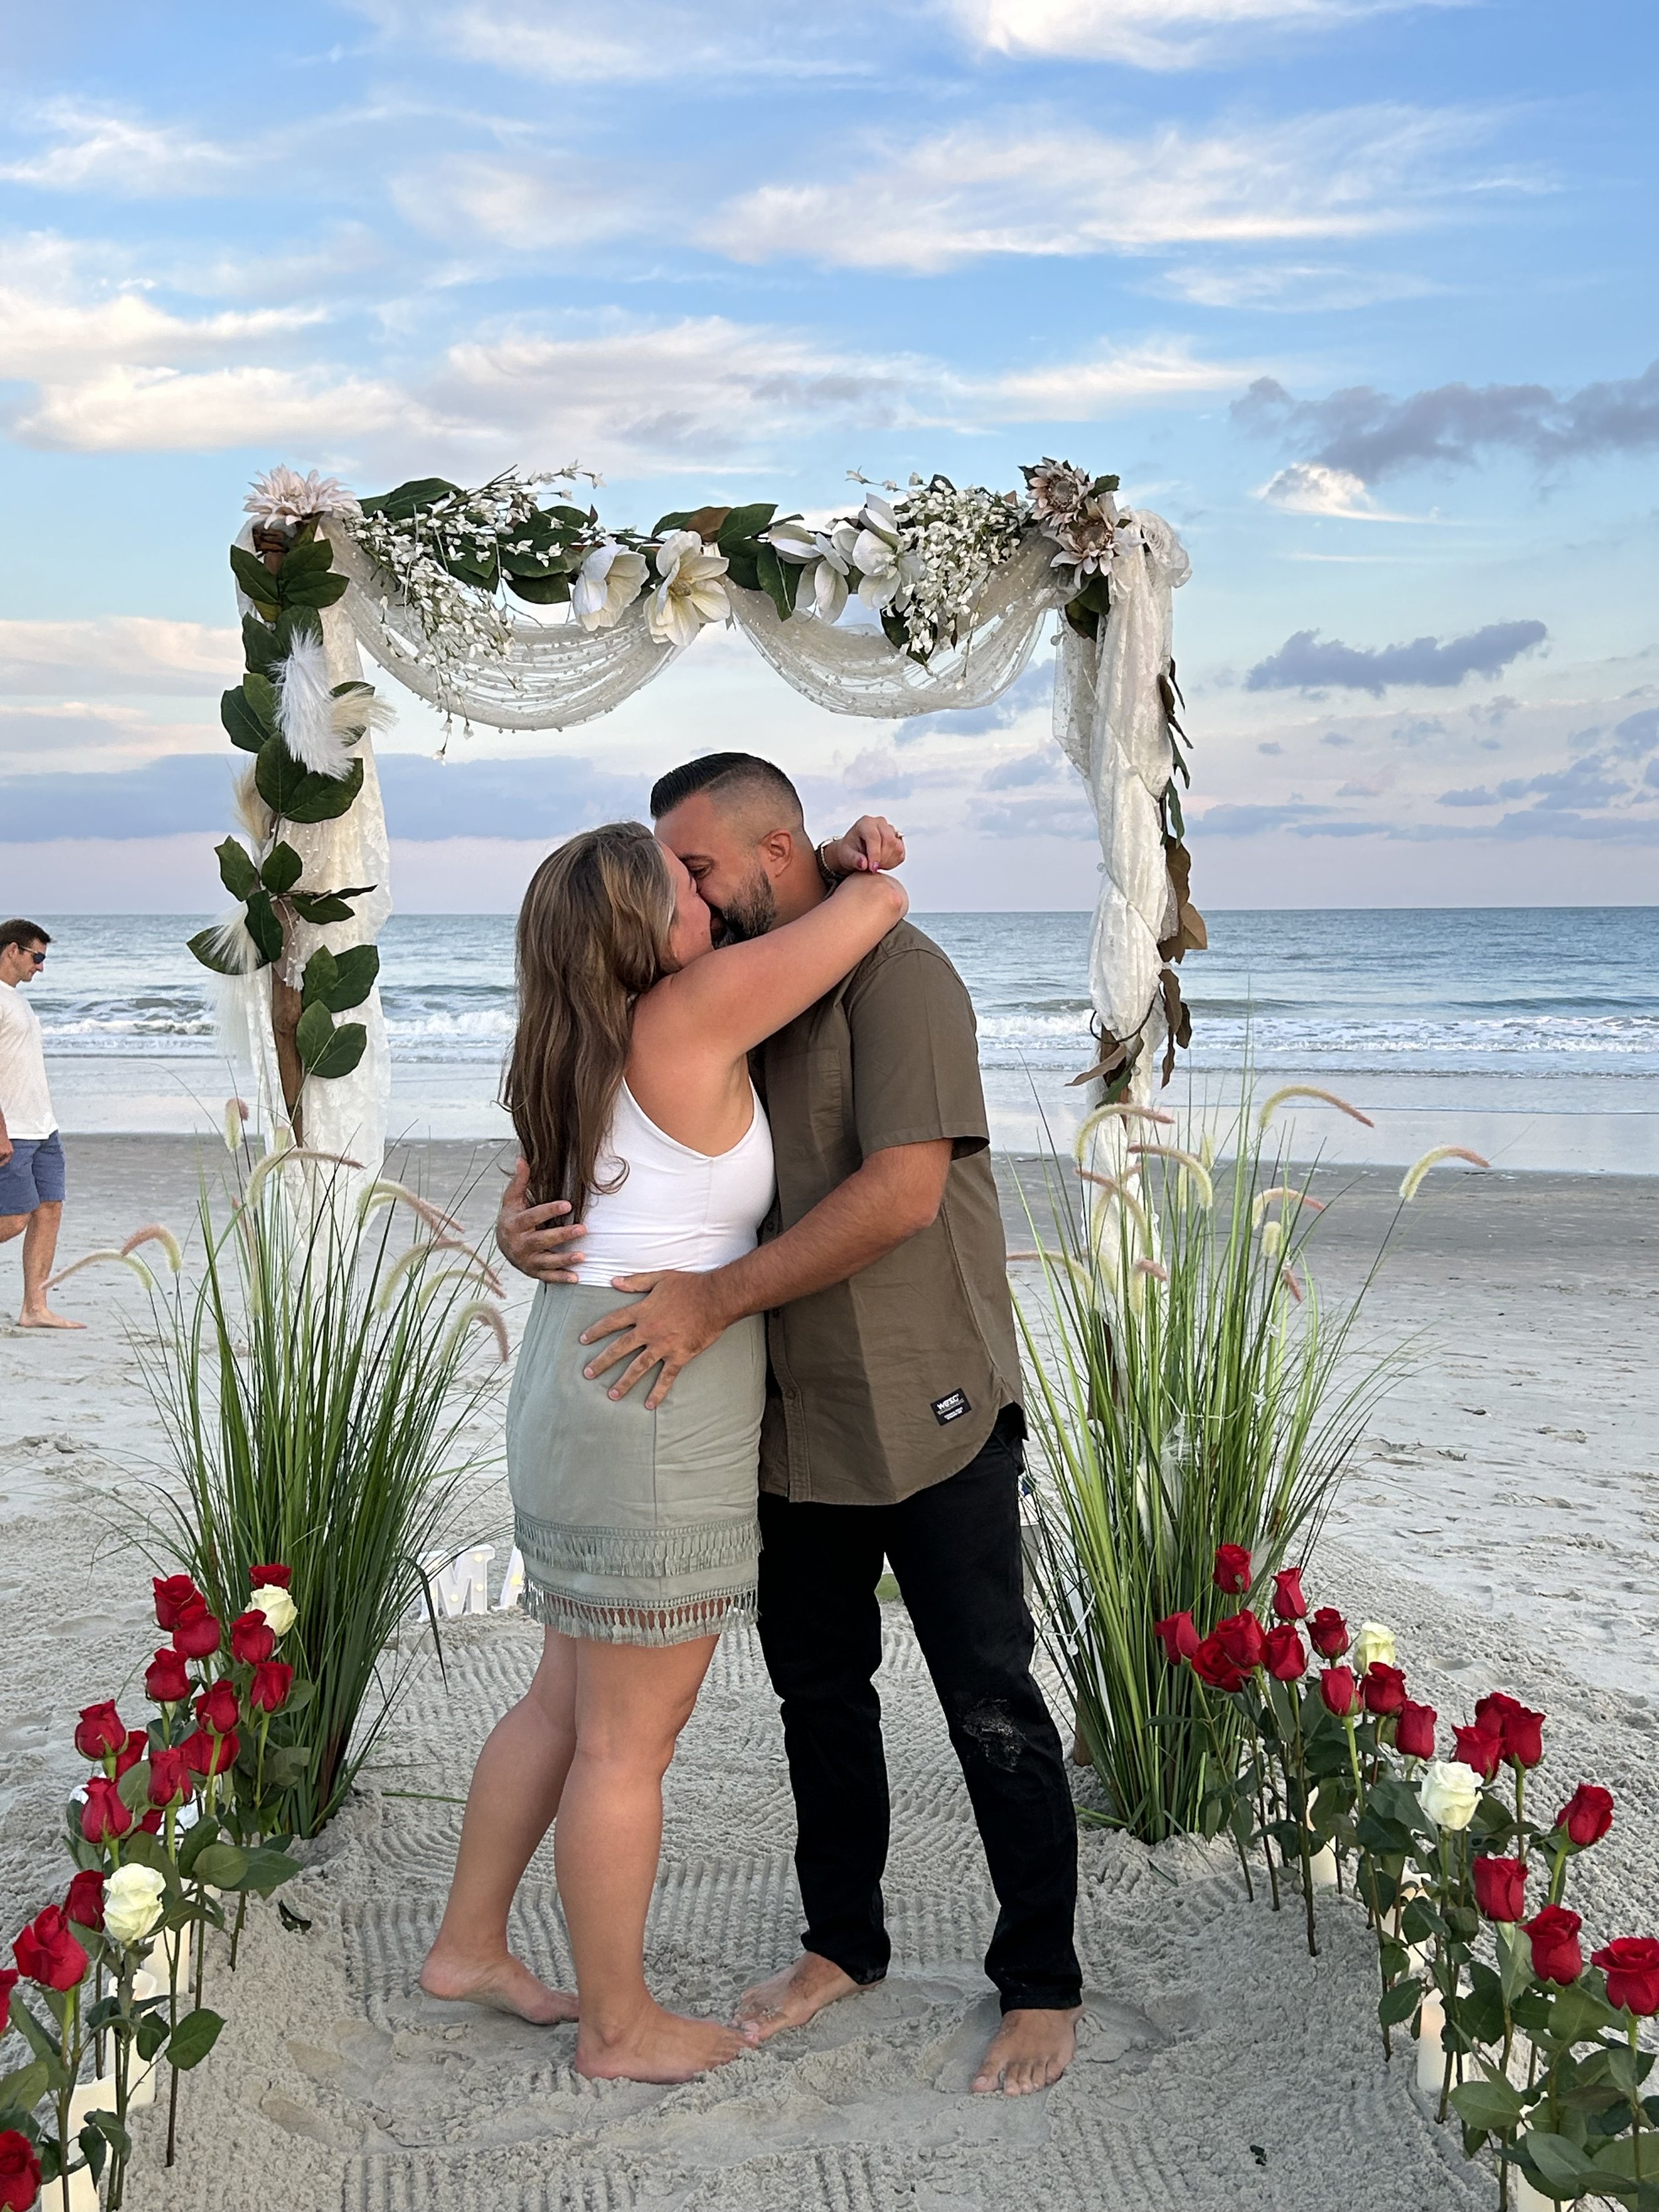


When proposing to your significant other, you want the experience to be memorable and filled with joy. Nobody wants a disastrous proposal story they'll cringe at for years to come. To ensure your proposal goes smoothly and according to plan, consider the following tips:
1. Know Your Partner
Understanding your partner's preferences, personality, and comfort level is crucial. Pay attention to their likes and dislikes, as well as their comfort level with public displays of affection or attention. A proposal should reflect their personal taste and values. There’s nothing worse than planning a fantastic proposal in a very public space only to have your loved one feel mortified! Who should be there? Parents? Friends? Family?
2. Location, Location, Location
Choosing the right location for your proposal is vital. Consider places that hold sentimental value for you both or locations your partner has expressed interest in visiting. The place you first met, your favorite restaurant, a romantic sunset on the beach…
3. Timing is Key
Timing plays a significant role in a successful proposal. Choose a moment when your partner is relaxed and receptive to romantic gestures. Avoid proposing during stressful times, when emotions might be heightened, or when your partner is preoccupied with other important events.
4. Keep It Personal and Meaningful
Tailor your proposal to reflect your unique relationship. Incorporate personal touches, such as inside jokes or memories, into your proposal plan. This will show your partner the effort and thought you put into making the moment special and unforgettable.
5. Consider Practicalities
Ensure you have practical details covered to avoid unnecessary complications or worries. For example, have a contingency plan for bad weather, confirm reservations if needed, and ensure any special arrangements are coordinated in advance.
6. Enlist Support
If you're feeling overwhelmed, ask a picnic planner, trusted friends, or family members for advice and support. They can provide valuable insights or even help with logistic arrangements, making the proposal less stressful for you.
7. Engage a Photographer or Videographer
Having a professional capture the moment can be an excellent addition to the proposal. It allows you and your partner to relive the special moment and have high-quality images to cherish for a lifetime.
8. Manage Expectations
Although it's essential to put effort into planning your proposal, remember that perfection is not the goal. By managing expectations and grounding your plans in reality, you'll be better equipped to handle unexpected situations that may arise.
9. Relax and Enjoy the Moment
Lastly, remember to take a deep breath and enjoy the moment. It's natural to feel nervous or anxious, but try to remain present and focused on the love and commitment you're about to express. Let yourself savor the joy and excitement, knowing that you've done your best to create a beautiful and disaster-free proposal.
With careful planning and thoughtful execution, your proposal will be a memory you both cherish for a lifetime. to avoid a disaster proposal